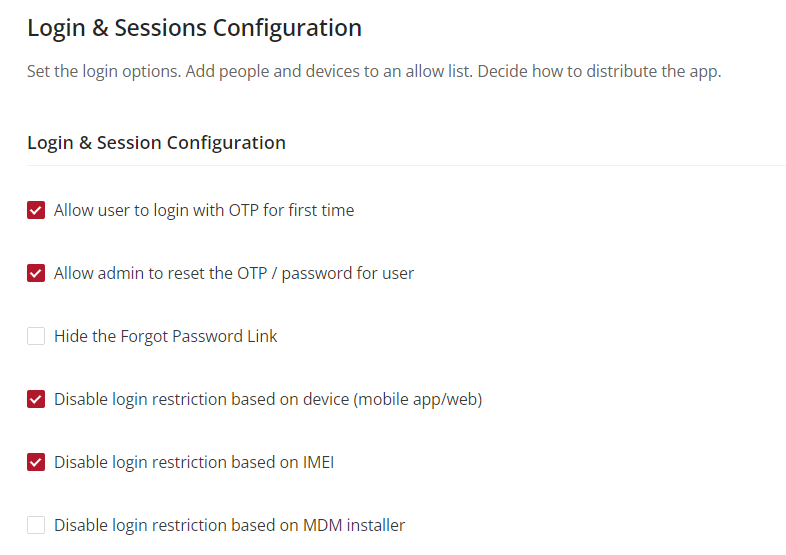
Login & Sessions Configuration
This is the primary header, indicating that the settings below pertain to the configuration of user logins and their sessions.
- Allow user to login with OTP for the first time:
-
Description: When enabled, users can use a One-Time Password (OTP) for their initial login.
-
Allow admin to reset the OTP / password for user:
-
Description: If activated, the system administrator has the authority to reset the OTP or password for any user.
-
Hide the Forgot Password Link:
-
Description: Enabling this option hides the "Forgot Password" link on the login page, preventing users from resetting their passwords themselves.
-
Disable login restriction based on device (mobile app/web):
-
Description: When activated, users can log in from any device, whether it's a mobile app or a web interface.
-
Disable login restriction based on IMEI:
-
Description: Checking this option removes login restrictions based on a device's IMEI number.
-
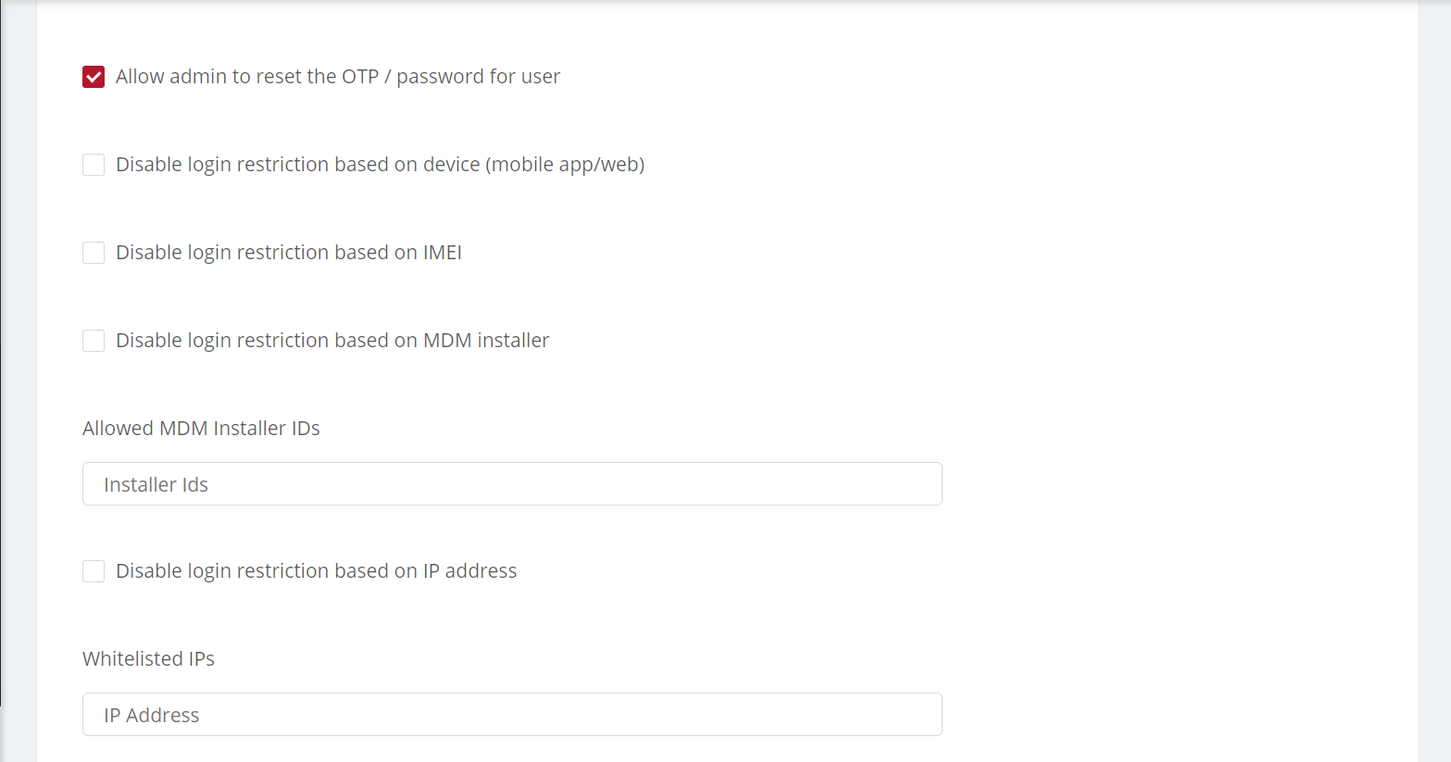
Disable login restriction based on MDM installer:
-
Description: This option eliminates login constraints set based on the Mobile Device Management (MDM) installer.
-
Allowed MDM Installer IDs:
-
Description: Enter specific MDM Installer IDs that are permitted to access the system in this field.
-
Disable login restriction based on IP address:
-
Description: When enabled, users can log in from any IP address without restrictions.
-
Whitelisted IPs:
-
Description: You can specify particular IP addresses that are allowed to access the system in this section.
-
Login Session Timeout (in ms):
-
Description: Administrators can set a timeout for user sessions in this field. If users are inactive for the specified time, they'll be logged out automatically.
-
Allow concurrent sessions for user:
-
Description: Enabling this option allows a single user to have multiple sessions active simultaneously.
-
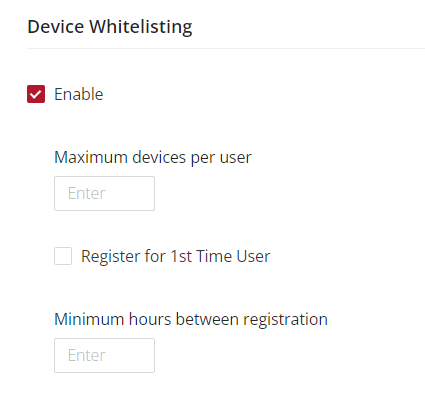
Device Whitelisting:
- Description: This toggle allows the system admin to enable or disable the feature where only whitelisted devices can access the system.
How to Configure Logins and Sessions
- Login to Vymo Web App:
- Go to the Vymo web app login page.
-
Enter your credentials and log in.
-
Access Self-Serve Page:
- After logging in, look for the gear icon in the upper-right corner of the screen.
-
Click on the gear icon to access the self-serve page.
-
Navigate to User Management:
-
On the self-serve page, locate the "User Management" section.
-
Access Login & Sessions Configuration:
-
Under "User Management," click on "Login & Sessions Configuration."
-
Customize Settings:
- Follow the on-screen instructions to customize your login and session settings as per your requirements.
-
You can configure options such as enabling OTP for the first-time login, setting session timeouts, device restrictions, and IMEI number restrictions.
-
Save Changes:
-
After making all the necessary adjustments, click the "Save" button located at the top right of the screen.
-
Release Changes:
- Upon clicking "Save," a pop-up or message box will appear informing you that the changes have been saved as a draft.
- In the pop-up or message box, find and click the "Release changes" option.
- A prompt will ask for confirmation. Click "Yes, Proceed" to confirm your intent to move the draft changes to the live configuration.
- Shortly after, you'll receive an OTP in your registered email.
- Enter the received OTP in the provided field on the Vymo web app.
- Click "Submit."
-
Patiently wait for a moment until you see a confirmation message indicating that the configuration process has been completed.
-
Verify Changes:
- To ensure the changes have been implemented, log out of the Vymo web app.
- Log back in, and navigate to the "Login & Sessions Configuration" to review and confirm the changes you made.
By following these steps, you should be able to configure and verify the "Login & Sessions" settings in the Vymo web app efficiently.
How to Prevent Logins from Specific IMEI or Device IDs
In order to enhance security, the Vymo app provides the capability to restrict access based on specific device IDs or IMEIs.
Step-by-Step Guide:
- Log into the Vymo Self-Serve:
-
Go to the Vymo self-serve platform.
-
Access User Management:
-
Within the self-serve platform, navigate to the "User Management" section.
-
Open Logins & Session Configurations:
-
Click on "Logins & Session Configurations" within the User Management section.
-
Disable Device and IMEI Restrictions:
- Look for the options "Disable login restriction based on device (mobile app/web)" and "Disable login restriction based on IMEI".
-
Ensure both these options are unchecked.
-
Enter Permitted IP Addresses:
-
Enter a comma-separated list of IP addresses that are permitted. Any IP address not on this list will be denied access.
-
Commit Configuration Changes:
- Click on "Release changes" to commit the modifications to the configuration.
-
Confirm your decision by clicking "Yes, Proceed".
-
Provide Email Address for OTP:
- Provide necessary details for the release, especially making sure to specify your own email address.
- You'll receive a one-time password (OTP) at this email ID to continue with the process.
-
Click "Proceed" to move to the next step.
-
Enter OTP for Confirmation:
-
Enter the received OTP into the Vymo web app and click "Submit".
-
Wait for Confirmation:
-
Wait for a while until a confirmation message appears, notifying you that the process is complete.
-
Verify Configuration:
- For verification purposes, log out of the Vymo app and then log back in.
By following these steps, you can prevent logins from specific IMEI or device IDs in Vymo, enhancing the security of your platform.
How to Whitelist Devices
Device whitelisting is a security measure to control and limit the number of devices that can access the Vymo app. This ensures that users can't use the application on numerous devices at once, enhancing the app's security.
Step-by-Step Guide:
- Log into the Vymo Web App:
-
Start by logging into the Vymo web app using your credentials.
-
Access User Management:
-
Once logged in to self-serve, head to the "User Management" section.
-
Navigate to Login & Sessions Configuration:
-
Within "User Management," find and click on "Login & Sessions Configuration."
-
Enable Device Whitelisting:
- Look for the "Device Whitelisting" subsection.
-
Choose the "Enable" option.
-
Specify Maximum Devices:
-
Here, you can specify the maximum number of devices a user is permitted to log in from. For instance, if you set it to '2', a user can only access the Vymo app from two different devices.
-
Configure First-Time User Authentication:
- Find the option "Register for 1st Time User."
- Selecting this option means you want new users to undergo an authentication process during their initial login. This enhances security for first-time access.
-
If you wish to provide direct access to the app for users logging in for the first time, without any authentication, uncheck this box.
-
Set Time Frame for Device Changes:
-
Define a specific time frame within which users are prevented from logging into the Vymo app on multiple devices. This is especially useful to deter rapid, repeated attempts to access the app from various devices.
-
Add Device Whitelist Label:
- Optionally, you can add a label for device whitelisting.
By following these steps, you can implement device whitelisting in Vymo to enhance the security of your application and control device access effectively.