How to create fields
Fields are used to store data for leads, partners, and users. Fields for leads and partners can be different for each module. Fields for users are common for all users in a company.
You can add fields to modules and for users, as needed.
No deletions
Before you create a field, evaluate whether using an existing field meets your requirements because fields once created cannot be deleted; they can only be disabled.
After you disable a field, it is hidden; it's no longer visible on the forms in that module.
Fields created in a module are applicable only to that module. To use similar fields in another module, you must create those fields again in that other module.
Fields for users are applicable to all users in that company.
Configuration options
Options common to all field types are:
- Whether the field is mandatory or optional.
- Whether the field can be edited when used for a form or is it a read-only field.
Field metadata
| Field type | Options |
|---|---|
| Text | Placeholder text, minimum and maximum number of lines, regex for validation, message to be displayed if the validation fails |
| Number | Minimum and maximum length, regex for validation, message to be displayed if the validation fails |
| Sentence | Minimum number of lines |
| Label | Text to be displayed |
| Pincode | Minimum and maximum length, regex for validation, message to be displayed if the validation fails |
| Decimal | Minimum and maximum length, regex for validation, message to be displayed if the validation fails |
| Currency | Minimum and maximum length, regex for validation, message to be displayed if the validation fails |
| Location | Subtypes, whether the location can be pinned |
| Date | Earliest date possible, latest date possible |
| Date of birth | From age and To age |
| Time | None |
| Meeting | Duration, whether mandatory, whether to show location, allowed for how many days in the past and future |
| Callback | None |
| Phone | Placeholder text, minimum and maximum number of characters, regex for validation, message to be displayed if the validation fails |
| Minimum and maximum number of characters, regex for validation, message to be displayed if the validation fails | |
| Aadhaar | None |
| PAN | None |
| Referral | Whether online is allowed |
| Multi-select | Whether single-select is allowed |
| Dropdown * | Default value, other values, values from another dropdown list, whether single-select, whether multi-select, dependent fields for values |
| Multimedia | Minimum and maximum number of files, whether document or image |
* For dropdown lists, the options must be defined through the old self serve interface. See How to create dropdown fields.
Advanced settings
Additionally, for every field type, depending on the value entered in that field on an input form, you can specify that additional fields be also displayed on the input form.
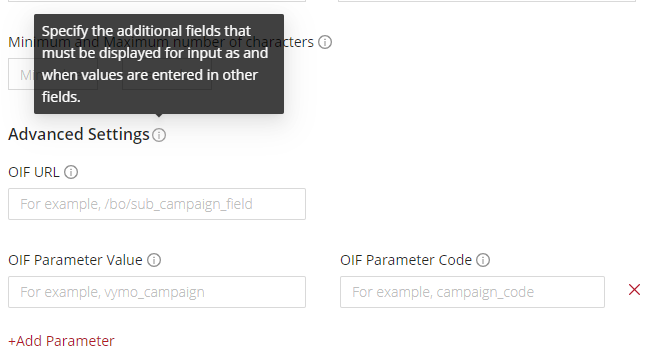
The additional fields are fetched through an API, for which you specify the details like this:
- OIF URL: The slug or path to the API to use to populate the input form.
- OIF Parameter Value: The value of the parameter to pass in the API. This value should be the same as the input field code of another field on the form.
- OIF Parameter Code: The code in the API that corresponds to this parameter.
How to
- Log in to the web app and click the gear icon :octicons-gear-16: at the top right.
- Go to the Field Configuration page by using any of these methods:
- To create fields for a leads or partners module, in the Module Settings section, click the module where the fields are to be created. Then, click Field Configuration.
- To create fields for user data, in the User Management section, click Field Configuration. Or, you can also click the Setup Menu near the top, and in the User Management dropdown list, click Field Configuration.
- In the Search box near the top, type
field configurationand, in the search results, click the module where the fields are to be added.
- On the Field Configuration page, at the left, click Add New and drag a field from the left to the center. (Or, you might choose to use the Add Field option (towards the right), select a field type from the options, and enter the configuration options).
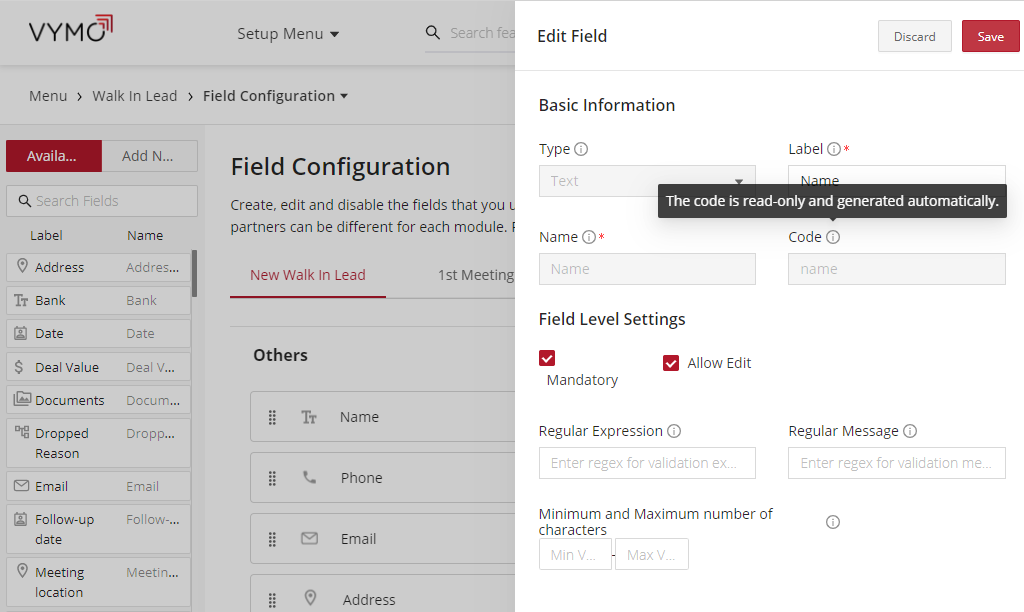
- To configure the field, click the pencil icon :material-lead-pencil:. On the Edit Field page, make the changes. The options that are available to you are described in the table at Configuration options.
- When you are done, click Save.
Visual guides
For modules
One way of creating fields:
Another way of creating fields:
For users
Result
You can now use the field in your module. The field is displayed on the list of available fields on the Field Configuration page.
Concepts
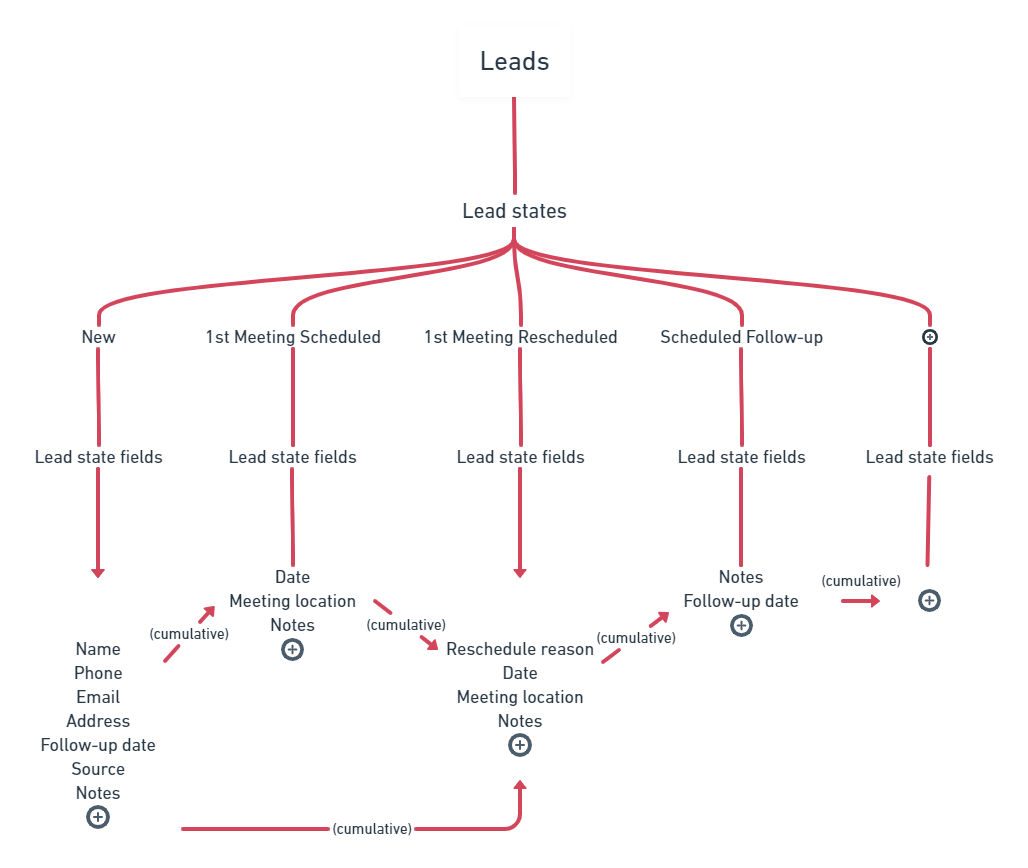
Data about leads, partners, activities, and people are recorded in fields. Each field in a record is associated with one, and only one, attribute of that lead, partner, activity, or person.
Fields are used for the following aspects:
- States such as
New,1st meeting scheduled,Meeting rescheduled,Dropped, and other states. - Transitions, which means when a lead moves from one state to another, for example, when a lead moves from a
Newstate to aMeeting scheduledstate. - Input forms
- Storing computed data that's not displayed to people but used in calculations.
The following image shows state fields for a leads record.
See also
- How to create dropdown fields
- How to change order of fields within a field group
- How to create field groups
- How to create referral fields