How to create transitions for lead states
Introduction
A state transition refers to the movement of a lead record from one state to another. This guide outlines the process of delineating points of entry and exit for each state to ensure smooth transitions.
What are States?
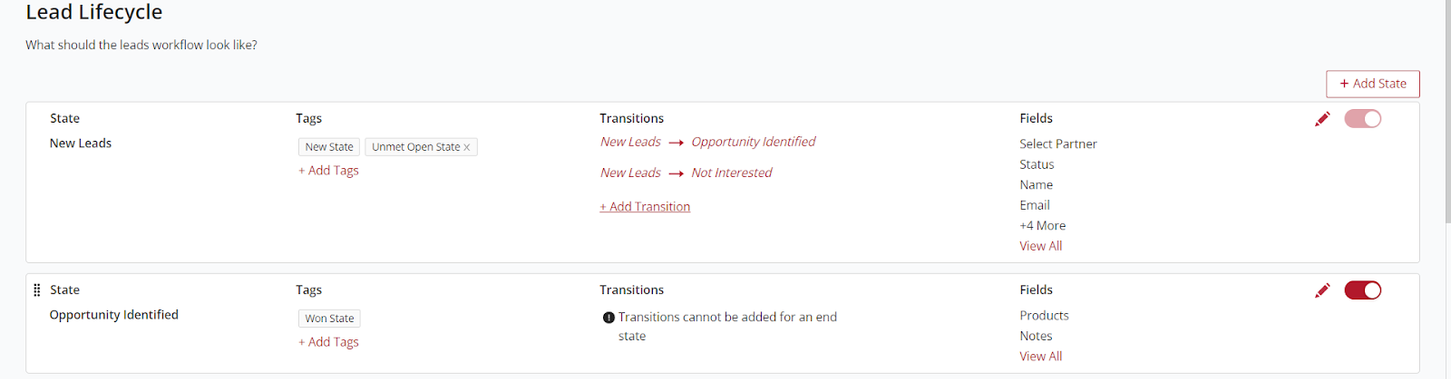
States represent specific stages in the lifecycle of a lead record, such as "New", "Assigned", or "Closed". They are crucial in defining the progression of a lead, from inception to conclusion as either "Won" or "Lost".
Usage of States
States are foundational to workflows, dictating the lead's journey through various processes like call scheduling or follow-up appointments.
Dependencies
- The states you want to transition between should be pre-established. See "How to create lead states" for guidance.
- State transitions are integral to call dispositions.
User Guide
Creating a state involves three tasks: creating the state, attaching tags, and implementing transitions. This guide focuses on the third task.
Steps to Create a Transition:
- Login: Access the Vymo web app and click the gear icon in the upper-right corner.
- Module Settings: In Module Settings, choose the module for outlining transitions.
- Lead Lifecycle: Select "Lead Lifecycle".
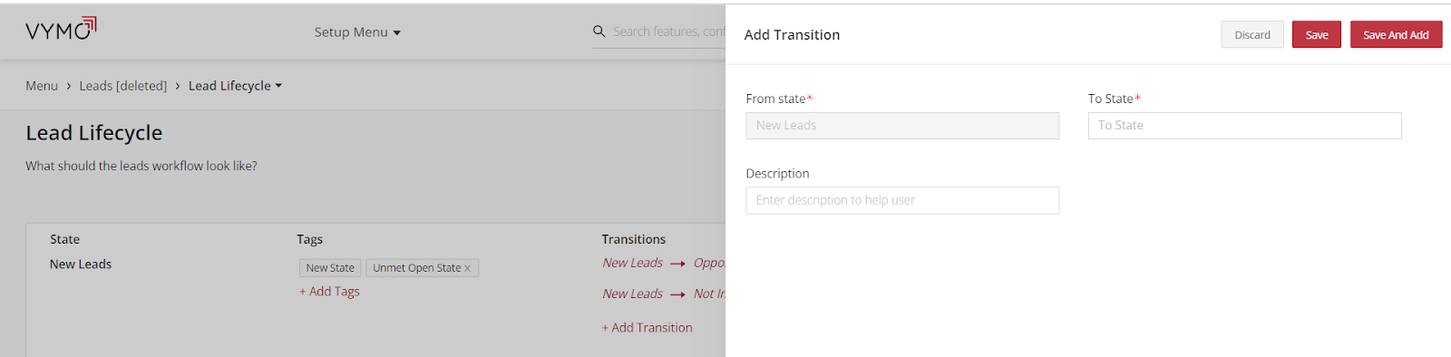
- Add Transition: Click "Add Transition" for the desired state.
- Specify Transitions: Define the "From" and "To" states for the transition.
-
Note: The inaugural state ("New") doesn't have a "From" state. Won and Lost are final states in the workflow.
-
Save: Configure all transitions, then click "Save" or "Save and Add" for additional transitions.
- Finalize: Confirm all configurations by clicking "Save" near the top right.
Results
Upon completing these steps, your state is officially established with defined transitions. You are now ready to configure lead state fields.
See also
- Lead Lifecycle
- Lead Lifecycle Overview
- How to create a leads module from a template
- How to create lead states
- How to add tags to lead states
- How to create transitions for lead states
- How to configure the state fields for leads
- How to enable or disable lead states
- How to enable or disable lead reassignment
- How to reactivate closed leads
- How to configure lead allocation rules
- How to specify the role permissions for the lead modules
- How to configure the lead reactivation behavior