Global Web Dashboards
Introduction
Different dashboards are available to various roles such as administrators, super users, and others when they login to the web interface. The layout and options available in each dashboard are tailored to suit the specific needs and permissions of each role. This guide will walk you through configuring these dashboards.
The difference between 'module dashboards' and 'global web dashboards' in a web application like Vymo mainly revolves around their scope and functionality:
Module Dashboards:
-
Scope: These dashboards are specific to individual modules within the application. For instance, if the application has separate modules for sales, marketing, and customer service, each module would have its own dashboard.
-
Functionality: The information and tools available on a module dashboard are tailored to the specific needs of that module. For example, a sales module dashboard might display sales pipelines, lead statuses, and performance metrics relevant to sales activities.
-
Customization: Module dashboards are often customizable to a degree, allowing users to tailor them to their specific role within that module, like a sales manager or marketing analyst.
Global Web Dashboards:
-
Scope: These dashboards provide a broader, more holistic view of the application. They are designed to give an overview of multiple modules or the entire system.
-
Functionality: A global web dashboard typically includes high-level information pertinent to the overall operation of the business or organization, such as overall performance metrics, system-wide alerts, and summaries of activities across all modules.
-
Customization: Global web dashboards are more likely to be standardized, offering the same view to all users who have access. However, they can sometimes be tailored based on user roles, like administrators or superusers.
In summary, while module dashboards focus on specific areas or functions of the application, providing detailed insights and tools relevant to that area, global web dashboards offer a comprehensive view of the entire application, catering to users who need to oversee or manage multiple aspects of the system.
Dashboard Types Based on Roles:
-
Superuser Dashboard: Tailored with extensive functionalities and configuration options for overall app management.
-
Manager Dashboard: Customized to cater to managerial tasks, tracking, and oversight.
-
Everyone Else Dashboard: A generalized dashboard layout for regular users with standard features and limited configurations.
Configuration Options
| Option | Mandatory | Default Values | Configurable | Dependencies |
|---|---|---|---|---|
| Dashboard Type | Yes | cover, productivity, allocations, leads, downloads, funnel | No | |
| Dashboard Name | Yes | Cover, Productivity, Allocations, |
Yes | |
| Code | Yes | cover, productivity, allocations, leads, downloads, funnel | No | |
| Enable Dashboard access | No | Yes | ||
| Display order | No | Yes | ||
| Allowed Roles for dashboard | No | nil | Yes | The roles must exist. If they don't, create them at Global Settings > Role. |
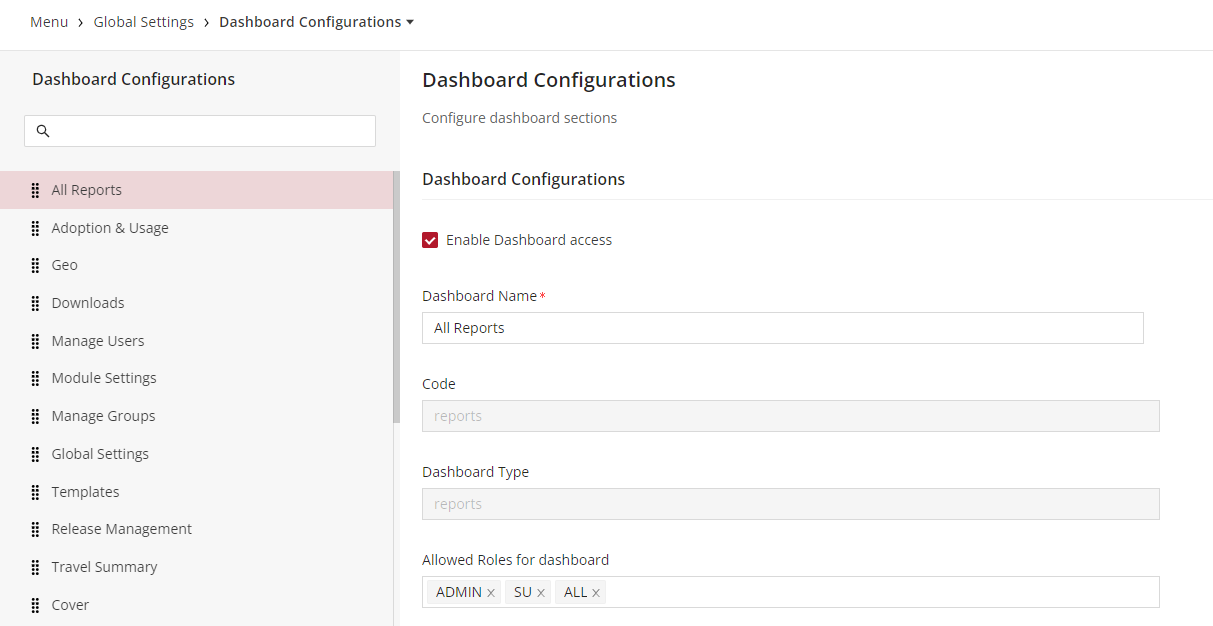
Dashboard Configuration Panel
-
Enable Dashboard Access: Checkbox to activate or deactivate the dashboard for users.
-
Dashboard Name: Input field to specify or edit the name of the dashboard.
-
Code: Input field where the system or user-defined code for the dashboard is provided.
-
Dashboard Type: Input field where the system or user-defined type for the dashboard is provided.
-
Allowed Roles for Dashboard: Here, you define which user roles have access to this dashboard. Multiple roles can be selected.
How to Configure the Dashboards for the Web App
Step-by-Step Configuration Guide
-
Login: Log in to self-serve.
-
Access Dashboard Settings: Choose "Global Web Dashboards" from the Global Settings section.
-
Configuration: You will be presented with various dashboard configuration options. Use the table above as a reference to understand each option's purpose, defaults, and dependencies. Customize as per your requirements.
-
Saving Changes: After making your desired changes, always click the "Save" button to apply the configurations.
-
Releasing Changes: Once saved, ensure you release the changes so they're effectively applied to the intended users. If you create more roles later, return to this configuration and review the dashboard access those roles have.