How to Enable or Disable Lead Reassignment
Introduction
Reassigning leads refers to the process where a lead, once designated to an individual, is transferred to another. This maneuver can be pivotal in optimizing workflows and ensuring leads are managed by the most appropriate personnel.
User Guide
- Login: Start by accessing the web app.
- Navigate to Module Settings: On "Self Serve", proceed to "Module Settings".
- Select Lead Module: Choose any lead module you wish to configure reassignments for.
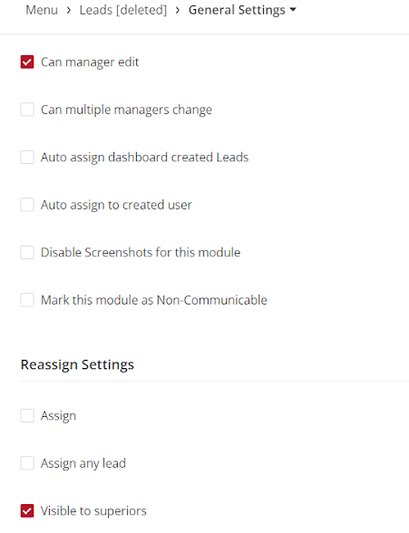
- Access General Settings: Navigate to "General Settings".
- Reassign Settings: Scroll down to the "Reassign Settings" section.
- Enable Reassignment: Activate the appropriate checkboxes to enable lead reassignment.
- Save Changes: Once configured, click "Save" found at the top right of the page.
- Release Management: After saving, opt for "Go To Release Management" to cement these alterations in the live environment.
- Create a UAT Release: Click "Create a UAT release", populate the release details using your email (for OTP reception), and click "Continue".
- OTP Verification: Enter the OTP received via email and press "Submit". Wait for a confirmation indicating the process's completion.
- Refresh: To view the changes, log out and then log back into the platform.
Note
While the alterations are retained in a draft state initially, they must be released to be enacted. After release, the new settings are activated either upon the next app login or during its subsequent update.
Results
With the reassignment feature enabled, leads primed for reassignment become accessible on the designated leads list page. To reassign a specific lead, select it, engage the "Reassign" option (usually located at the upper part of the screen), and designate the new individual for that lead.
See also
- Lead Lifecycle
- Lead Lifecycle Overview
- How to create a leads module from a template
- How to create lead states
- How to add tags to lead states
- How to create transitions for lead states
- How to configure the state fields for leads
- How to enable or disable lead states
- How to enable or disable lead reassignment
- How to reactivate closed leads
- How to configure lead allocation rules
- How to specify the role permissions for the lead modules
- How to configure the lead reactivation behavior