Setting up activities
You define the activities for modules and users, and you then specify the configuration options such as activity filters, role-based filter visibility, user delight, and activity edits.
Defining activities
See How to define activities and How to create activity groups.
Enabling draft save for activities
- Log in to the Vymo web app and click the gear icon :octicons-gear-16: in the upper-right corner of the screen.
- Click JSON Configuration in Global Settings.
- Go to Module Settings and select the checkbox for Enable Draft Save For Activities or set
enableDraftSaveForActivitiestotrue. - When done, click Save. Then, release the changes.
- Log in to the Vymo web app and click the gear icon :octicons-gear-16: in the upper-right corner of the screen.
- Select the module for which you want to enable draft save and click JSON Configuration.
- Go to Module Settings and select the checkbox for Enable Draft Save For Activities or set
enableDraftSaveForActivitiestotrue. - When done, click Save. Then, release the changes.
Creating filters for activities
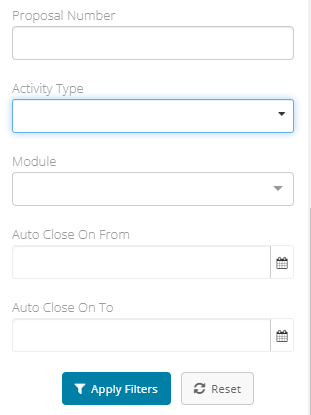
By default, the activities list shows all activities, and has the standard filters available for all lists. It can also contain additional filters that you specify. For example, the following screenshot shows an additional filter called Proposal Number.
To enable additional filters, add those parameters in the task_filters object.
- Log in to the Vymo web app.
- On the left panel, click Customize > Global Settings > Custom Configuration.
- In the
additionalConfigsobject, create atask_filtersobject (see how to create a JSON object) -
In the
task_filtersobject, create an object for every filter that you need. For guidance, use the following example code snippet, which creates a filter on the branch name."task_filters": [ { "type": "referral", "code": "referral_multi_filter", "hint": "Branch Name", "selection_hint": "Branch Name", "required": false, "single_select": false, "read_only": false, "source": "branches_new" } ] -
Click Save. You see a message that the changes are now saved as a draft.
- In the message box, click Go To Release Management so that you can move the changes permanently to the live configuration.
- Click Create a UAT release. Specify the release details and make sure to enter your own email ID because that's where you receive a one-time password (OTP) to continue with the process. Click Proceed.
- Enter the OTP you received in the email, and click Submit. Wait for a while till you see a confirmation message saying the process is complete.
- To see the changes, log out and log in again.
The filters you added are now available on the activity lists.
Specifying the visibility for activities
The activities list shows all activities where someone is an assignee or participant, and can take some action, for example, reschedule the activity or cancel it. Additionally, managers can use the Team filter to see the following activities:
- Activities assigned to people on their team
- Activities where their team members are participants
However, if managers can't take any action for an activity type, they can't filter the list by that activity type.

To enable managers to filter the activity list by task type, even for activities where they're not assignees:
- Log in to the Vymo web app and click the gear icon :octicons-gear-16: at the top right.
- Depending on the kind of activity:
- For module-level activities, in the Module Settings section, click the module for which the activities are to be defined. Then, click Activity Management.
- For generic activities, in the User Management section, click Activity Management.
- On the menu at the left, locate the activity and click it.
-
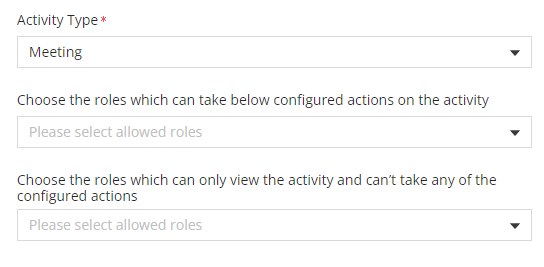
In the Basic Information section, look for the field that says Choose the roles which can only view the activity and can’t take any of the configured actions. Click inside the field and select the roles that can see this activity.
-
Repeat the earlier two steps for all the activity types that need manager visibility.
- When done, click Save. Then, release the changes.
Now, the filter options that people see for activity lists and Hello card are for these kinds of activities:
- Where they have viewing rights
- Where they're assignees and can take some action on the activities
Enabling the user delight feature
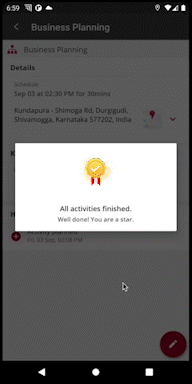
When enabled, people get celebratory messages when they complete a milestone.
- Log in to the Vymo web app.
- Click Customize > Global Settings > JSON Configurations.
- Locate the
featuresobject and, towards the right of the screen, select Collapse level:3. -
Find the array for
generic, and set thedisabledflag tofalse, like this:- On line 9,
hour_threshold: The time (in hours on the 24-hour clock) after which the celebratory messages are shown. The messages aren't shown as and when planned activities are completed. Rather, the messages are shown only after this specified time has elapsed, and a specific number of activities are completed within this time. A value of16(16:00) means the time is 4:00 PM, and the messages are shown only after 4:00 PM. - On line 10,
planned_activity_count_threshold: The minimum number of planned activities that must be completed for the messages to be displayed.
 1
 2
 3
 4
 5
 6
 7
 8
 9
10
11
12
13
{ "type": "generic", "disabled": false, "order": null, "code": "celebration", "name": "celebrations", "properties": { "activity_config": { "hour_threshold": 16, "planned_activity_count_threshold": 4 } } } - On line 9,
-
In the message box, click Go To Release Management so that you can move the changes permanently to the live configuration.
- Click Create a UAT release. Specify the release details and make sure to enter your own email ID because that's where you receive a one-time password (OTP) to continue with the process. Click Proceed.
- Enter the OTP you received in the email, and click Submit. Wait for a while till you see a confirmation message saying the process is complete.
- To see the changes, log out and log in again.
Enabling activity edits
When edits are enabled, an assignee (and their manager) can update an activity to add participants to it. They can do these edits if the activity isn't closed.
- Log in to the Vymo web app.
- Click Customize > Global Settings > Activity Configuration.
- Click the activity that can be edited. In the Activity Definition section, click inside the Actions field, and select
edit. - In the same section, scroll down to the Code field, and copy the code.
- Click Customize > Global Settings > JSON Configuration, and look for the
userTasksobject. -
Expand the
userTasksobject, and look for the array that has the activity code you copied in a previous step. Expand the array and set the value of theallowParticipantUpdateOnEditparameter totrue."allowParticipantUpdateOnEdit": true -
In the message box, click Go To Release Management so that you can move the changes permanently to the live configuration.
- Click Create a UAT release. Specify the release details and make sure to enter your own email ID because that's where you receive a one-time password (OTP) to continue with the process. Click Proceed.
- Enter the OTP you received in the email, and click Submit. Wait for a while till you see a confirmation message saying the process is complete.
- To see the changes, log out and log in again.