Vymo Docs content share
Sharing any type of company related content including videos, audios, images, and documents through Vymo app is possible with Vymo Docs.
How to use Docs
| Use | Share | Download |
|---|---|---|
| Choose any document on the repository to access it. If it's a video, you can stream the video without moving out of the Vymo app. | To share the document, click the dropdown icon located on the upper-right corner, and select Share. | You can download the document by selecting Download option. However, this option is customizable according to your company's requirement. You can enable or disable it at configuration settings. |
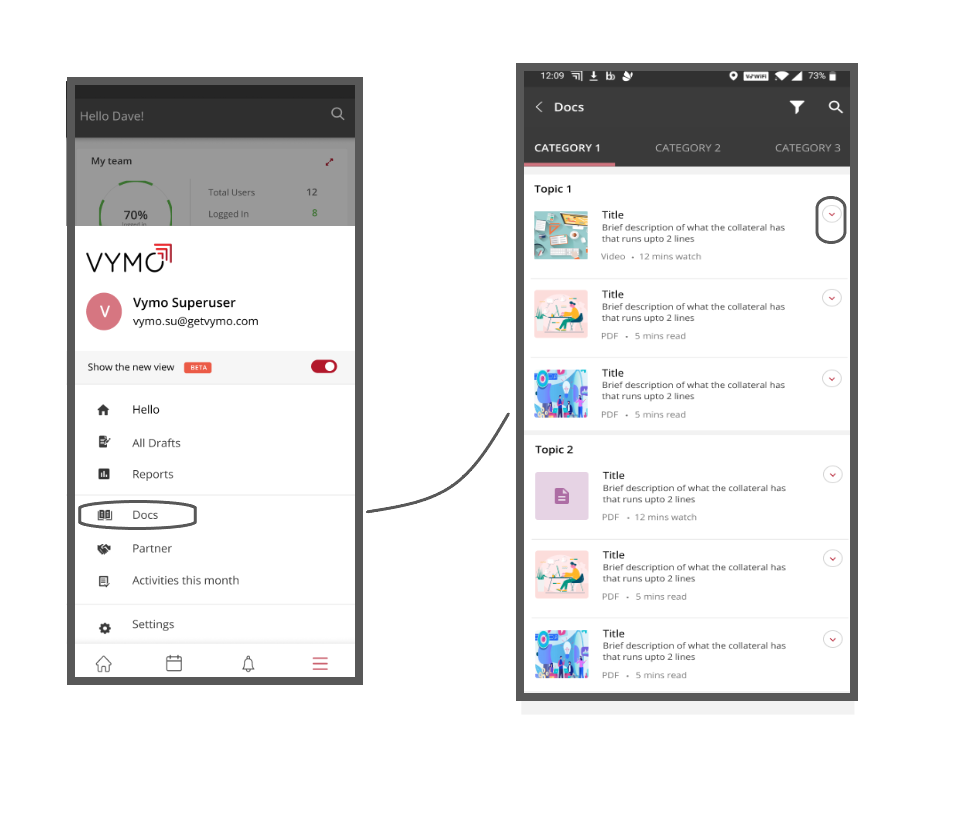
Finding Vymo Docs on your phone
- Log in to Vymo mobile app.
- Go to the Hamburger menu (three horizontal lines in the lower-right corner).
- Click Docs and you are now on the content repository page.
- Select the document you want to use, share or download from the repository. Downloaded images are located in your phone Gallery (Android) or Photos (iOS). Documents or applications that you download are located in the Downloads section in your phone.
Sharing the documents
- Select the Share option and choose the medium through which you share the document. The medium includes the messaging options the company has configured.
- Share the document or a link of the document through messaging applications like SMS or WhatsApp. SMS doesn't support attached documents, so you can only share the links of the document. The validity of the link is timely bound.
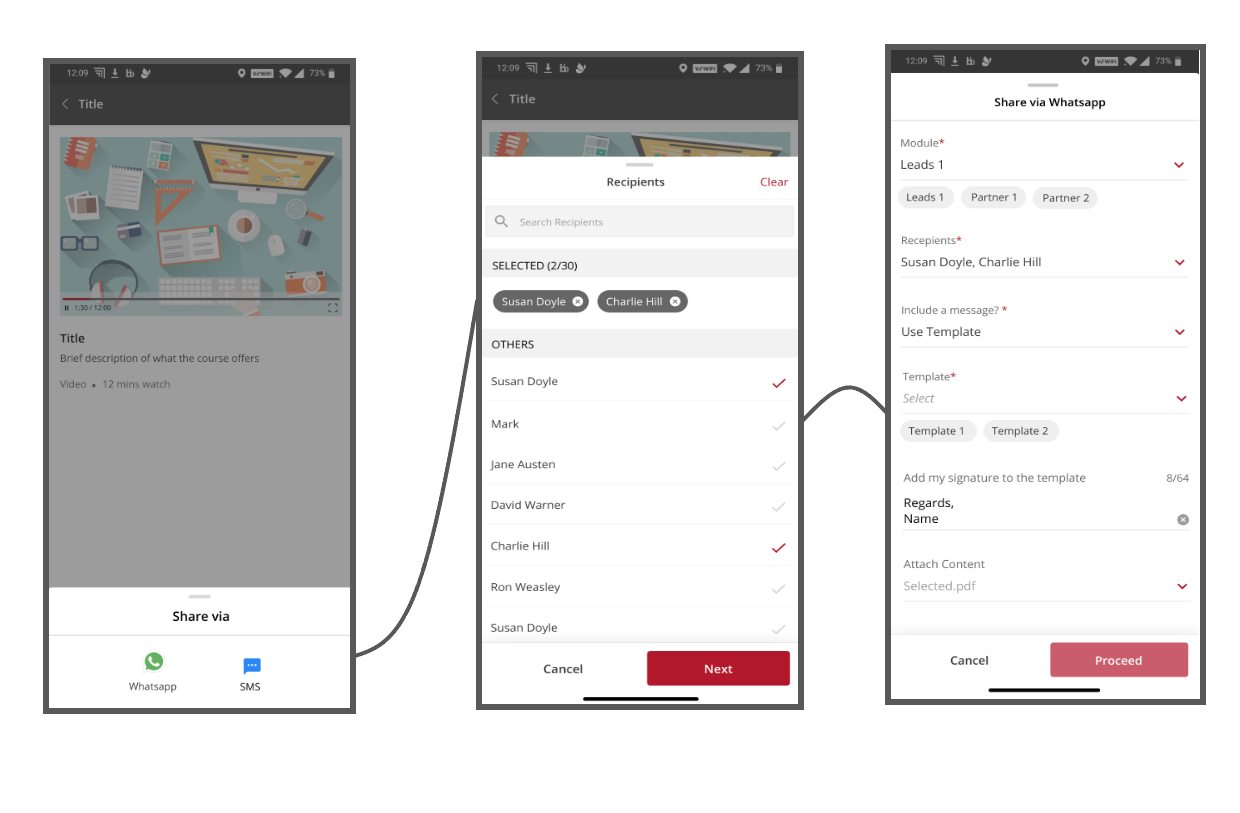
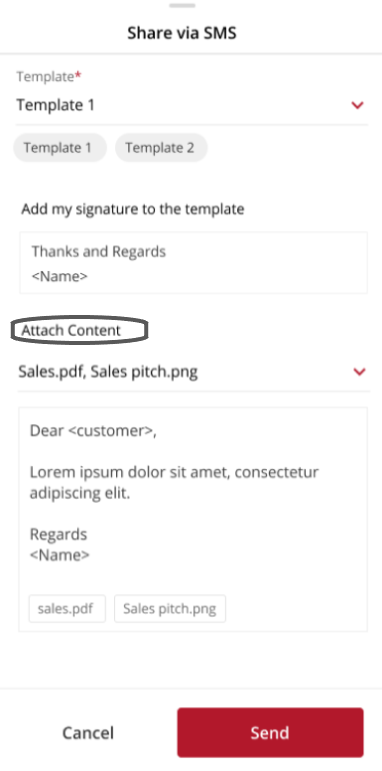
Choosing the message template
- Select the contents of your message after you select the medium (SMS or WhatsApp) and the recipient.
- Choose to draft a new message, pick a template or have an empty message with the attachment.
- Configure the templates using the Vymo Docs message template feature.
- Click Send after entering the details and the message with the content is sent to the recipient.
Configuring Docs
To use Docs, content share option has to be enabled. After enabling content share, upload the content in Vymo Docs which is located in the dashboard.
Enabling content share
- Log in to Vymo web app.
- Click Customize > Global Settings > Custom Configurations> additionalConfigs.
- Expand
additionalConfigsobject and click onfeaturesConfig>content_share. - To enable the content sharing feature set the value to
true, to disable change it tofalse. - In the message box, click Go To Release Management so that you can move the changes permanently to the live configuration.
- Click Create a UAT release. Specify the release details and make sure to enter your own email ID because that's where you receive a one-time password (OTP) to continue with the process. Click Proceed.
- Enter the OTP you received in the email, and click Submit. Wait for a while till you see a confirmation message saying the process is complete.
- To see the changes, log out and log in again.
Uploading content
- Log in to Vymo web app.
- In the dashboard (on the left side of the screen) click Vymo Docs.
- A list of uploaded documents and the nature of each document is visible to you.
- Click Upload Content located on the top right of the page to upload a new document. View the following table for details about the fields in the Upload Content page.
- Fill in the details and click Upload. To make sure document upload is successful, look into Vymo Docs repository on the mobile app.
| Field | Details |
|---|---|
| Title | Title of the content. This is the title of the document in the app. |
| Description | Describe the contents of the file or link. This description is shown under the title. |
| Content Type | Can be file or link. If the content is a file, it must be in PDF, TEXT, XLS, XLSX, PPT, PPTX, DOC, DOCX, JPG, JPEG, PNG, CSV, MP4, MOV, WMV, AVI format. Maximum file size is 50 MB. |
| Available on Platform | You can choose whether the content is available on the app, web, or server. To enable APIs to fetch the content, select the server option. |
| Category | The content in Vymo Docs is divided into different categories based on your company. Select the category under which this content shows on the app. Add categories or configure these options in Global Settings > Custom Configuration > additionalConfigs > content_config > document_config > category. Learn how to create a JSON object. |
| Module | Select the modules that can see the content you upload. Add modules or configure these options in Global Settings > Custom Configuration > additionalConfigs > content_config > interaction_config > mediums > allowed_module. Learn how to create a JSON object. |
| Allowed for Roles | Select the roles who can view the content. |
| Action Allowed | You can choose whether the content is shared, downloaded, or both. |
| Content Status | The content is visible on the Vymo app only if Publish is chosen. Draft, Submit, Approved, and Decommission are options that show the status of the content. |
Decommission, not deletion
After content is uploaded, it can't be deleted. This is because when the content is deleted, the content share history is lost. Instead of deleting, the content status can be set to Decommission. After it is set to this status, the content can no longer be viewed on the app. To enable the use of the content again, set the content status to Publish.