Integrations
Vymo offers integrations with various services to provide you with a comprehensive view of your sales activities. This page will guide you on how to integrate Vymo with other services you use. Integration options are displayed on the left panel, and you can click on each to specify the details.
Web Conference Integration
You can specify whether virtual meetings should be automatically logged as an activity in the Vymo app as soon as a meeting ends.
Vymo Integration with Zoom
Enabling the Zoom Integration Feature
If your company uses a paid Zoom plan (e.g., Pro, Business, or Enterprise plans), you have the option to automatically log your Zoom calls as activities in the Vymo app. To enable this integration, you need to link Zoom with the Vymo app.
Once the integration is enabled, Zoom calls with leads and partners will be automatically recorded as activities in the Vymo app as soon as the call ends. During the call, you will see the names of all participants, even if they are not leads or partners listed in the Vymo app. However, at least one participant in the call must be a lead or partner, and another participant must be a Vymo account user.
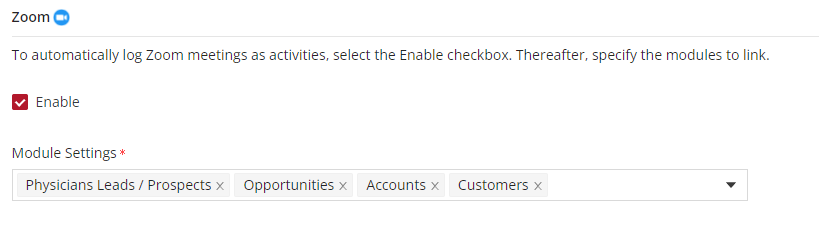
Here's how to enable the Zoom integration:
- Log in to the Vymo web app and navigate to "Self-Serve."
- Click on "Integrations" under Global Settings.
- Go to the Zoom section and click "Enable." Specify the modules for which this integration is enabled.
- Click "Save." You will see a message indicating that the changes are saved as a draft.
- In the message box, click "Go To Release Management" to move the changes permanently to the live configuration.
- Click "Create a UAT release" and specify the release details. Make sure to enter your own email ID because that's where you will receive a one-time password (OTP) to continue with the process. Click "Proceed."
- Enter the OTP you received in the email and click "Submit." Wait for a confirmation message indicating the completion of the process.
- To see the changes, log out and log in again.
By following these steps, you can enable the Zoom integration in Vymo and automatically log your Zoom calls as activities in the app.
Vymo Integration with Microsoft Teams
Introduction
For organizations using Microsoft Teams, Vymo provides a streamlined process to automatically log meetings as activities within the app. This integration allows you to schedule, manage, and join Microsoft Teams meetings directly through Vymo.
Integration Prerequisites
Before you can use the Microsoft Teams integration with Vymo, there are certain prerequisites to consider:
- At least one meeting participant must be a Vymo lead, partner, or user.
- The meeting host must have both a Vymo account and a licensed Microsoft Teams account.
API Permissions
Vymo's integration with Microsoft Teams relies on the Microsoft Graph REST API and requires specific permissions for effective functionality:
- API Permission Requested: OnlineMeetings.Read.All
- Access Granted: Scheduling and reading online meetings
-
Justification: Fetches completed meeting details to log as sales activities; Retrieves invitee list and meeting details.
-
API Permission Requested: CallRecords.Read.All
- Access Granted: Reading call records
-
Justification: Provides meeting participants and duration; Analyzes meeting records where the host is a Vymo user.
-
API Permission Requested: User.Read.All
- Access Granted: Reading user profiles and group memberships
-
Justification: Maps Microsoft IDs to Vymo user emails; Reads user records involved in meetings hosted by Vymo users.
-
API Permission Requested: OnlineMeetingArtifact.Read.All
- Access Granted: Reading online meeting artifacts
- Justification: Associates Microsoft IDs with Vymo user emails for attendance; Reads attendance details for Vymo-scheduled meetings.
Enabling Microsoft Teams Integration
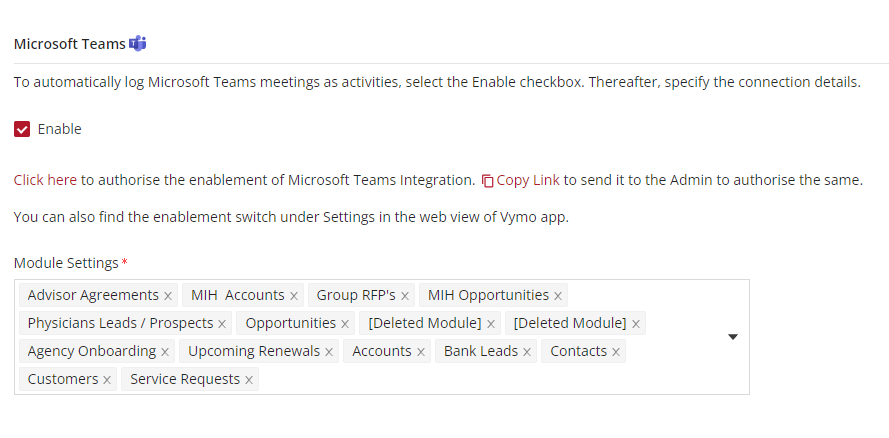
To enable the Microsoft Teams integration with Vymo, follow these steps:
-
Log in to the Vymo web app and navigate to "Self-Serve."
-
Under the "Global Settings" section, navigate to "Integrations" and select the "Microsoft Teams" section.
-
Click "Enable" and copy the link provided. Send this link to your company's administrator to connect Microsoft Teams to Vymo. If you are the administrator, continue to the next step.
-
Save your settings and release the changes.
By following these steps, you can enable the integration between Vymo and Microsoft Teams, allowing you to schedule, manage, and log meetings seamlessly within the app.
Connecting Microsoft Teams to Vymo
Once the integration between Microsoft Teams and Vymo is enabled, the company's IT administrator should follow these steps to complete the connection:
-
Log into the Vymo web app and go to "Self Serve."
-
Under "Global Settings," click on "Integrations."
-
In the "Microsoft Teams" section, click the provided link to start the authorization process.
-
Sign in to Microsoft using the administrator account. Ensure that the application name is "Vymo - MS Teams Connector."
-
Verify that all three permissions listed are granted:
- Read all users’ full profiles
- Read and create online meetings
-
Read all meeting records
-
Save and release the changes.
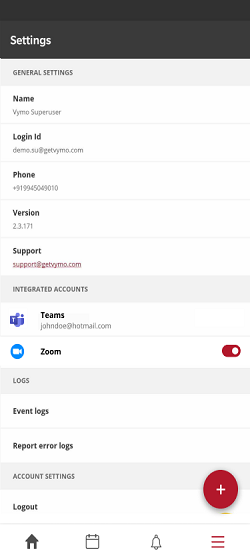
After successfully connecting Microsoft Teams to Vymo, you should be able to see it in the Settings page.
User Mapping Between Vymo and Microsoft Teams
For the Vymo and Microsoft Teams integration to work seamlessly, there needs to be a mapping between user records in both systems. The default user mapping is done using email IDs, where the email field on the Vymo user record is mapped to the mail field on Azure AD (Microsoft Teams) to match users between Vymo and Microsoft Teams.
To modify user mapping, follow these steps:
-
Access the JSON Configuration within the Global Settings.
-
Locate the
teams_integrationobject in the JSON configuration. -
Modify the
teams_keyparameter to specify the Microsoft Teams ID, and thevymo_keyparameter to specify the Vymo ID. The following example code maps Microsoft Teams user ID asmailand Vymo ID asemail. You can use different keys based on your company's preference. -
Save and release the changes to apply the new user mapping.
Example JSON Configuration:
```json { "type": "generic", "disabled": false, "order": null, "code": "teams_integration", "name": "Teams Integration", "properties": { "valid_meeting_duration": 0, "user_mapping": { "teams_key": "mail", "vymo_key": "email" }, "valid_meeting_criteria": { "vo_count": 1, "v_user_count": 1 } } }
Specifying Meeting Criteria
A Microsoft Teams meeting is logged as an activity only if it meets specific criteria, including a minimum duration and the presence of a minimum number of participants. These criteria can be customized based on your company's preference.
To specify meeting criteria, follow these steps:
Within the JSON Configuration, locate the teams_integration object.
Set the valid_meeting_duration parameter in seconds to define the required meeting duration.
Define the minimum number of participants required in the valid_meeting_criteria section.
Save and release the changes to apply the new meeting criteria.
Example JSON Configuration:
```json
{ "type": "generic", "disabled": false, "order": null, "code": "teams_integration", "name": "Teams Integration", "properties": { "valid_meeting_duration": 0, "user_mapping": { "teams_key": "mail", "vymo_key": "email" }, "valid_meeting_criteria": { "vo_count": 1, "v_user_count": 1 } } }
Vymo Integration with Webex
For organizations using Webex for communication, Vymo offers the capability to automatically log calls as activities in the app. This integration streamlines call tracking and activity management within Vymo.
Pre-requisites for Integration
Before you can integrate Webex with Vymo, make sure the following conditions are met:
-
All participants' names appear during a call, and at least one participant must be a registered lead, partner, or Vymo user for the call to be logged.
-
The call host must be a Vymo user.
Enabling Webex Integration in Vymo
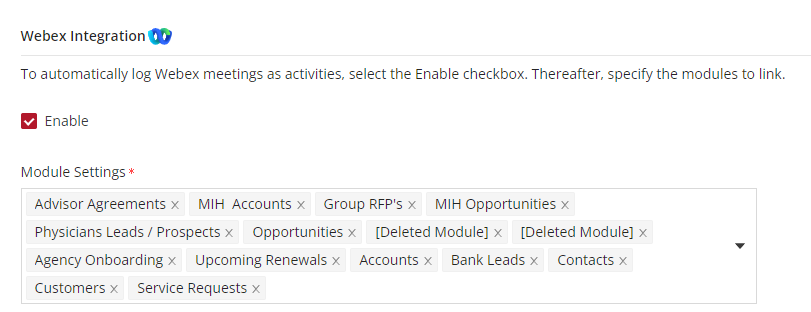
To enable the integration between Webex and Vymo, follow these steps:
-
Log In: Access the Vymo web app and proceed to the self-serve area under global settings.
-
Navigate to Integrations: Locate the Webex section and click "Enable" to activate the integration for your account.
-
Save and release the changes.
Connecting Your Webex Account to Vymo
Once Webex is integrated with Vymo, follow these steps to connect your Webex account:
-
Tap the Hamburger icon in the Vymo app and select "Settings."
-
Activate the Webex toggle under "Integrated Accounts" (If the toggle is not visible, Webex integration may not be enabled for your company).
-
Follow the prompts to allow the Vymo app access to your Webex calls.
Your Webex account is now linked, and calls made to leads and partners will be automatically logged as activities within Vymo.
By following these steps, you can seamlessly integrate Webex with Vymo for enhanced call tracking and activity management.
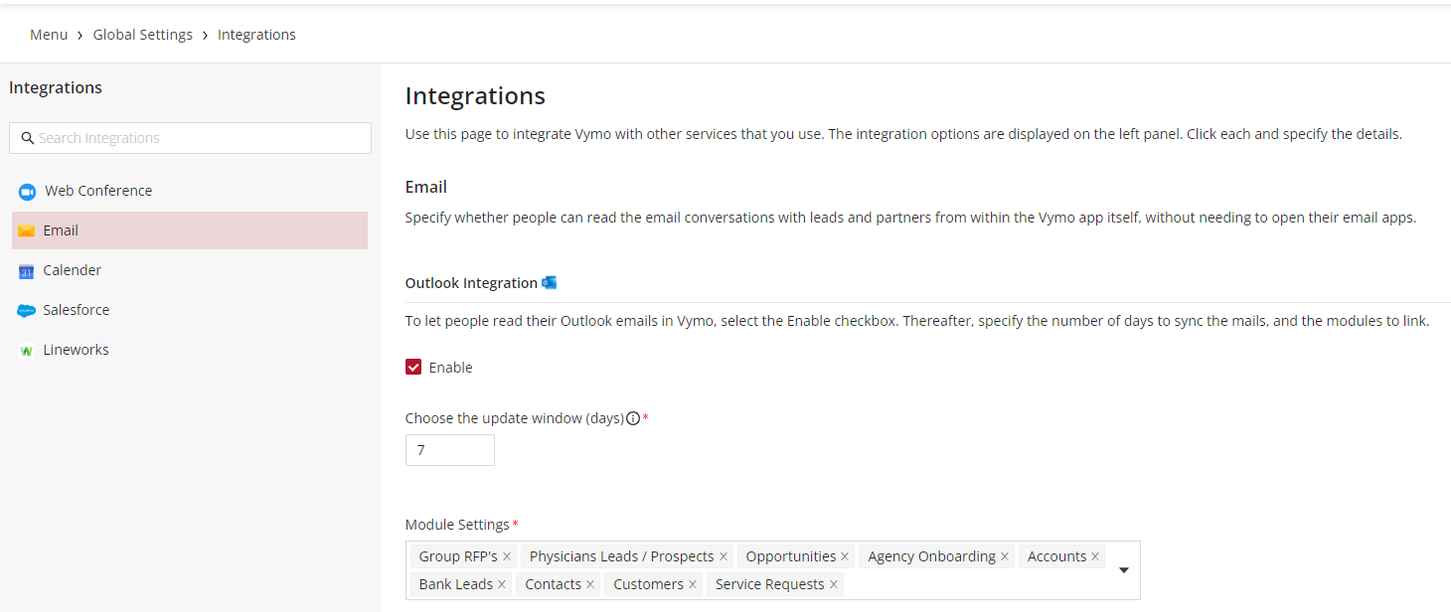
Vymo Integration with Microsoft Outlook
Vymo allows you to read email conversations with leads and partners from within the app, without needing to open your email client. This guide explains how to integrate Microsoft Outlook with Vymo for seamless access to email conversations.
Email Synchronization Criteria
Vymo syncs emails that involve communication with recognized leads and partners. Here are the specific synchronization criteria:
-
Incoming Emails: Only emails from senders listed as Vymo leads or partners are synced.
-
Outgoing Emails: Emails sent to recipients in the To, Cc, or Bcc fields who are listed as Vymo leads or partners are synced.
Please note that emails from deleted contacts will not be displayed in Vymo.
Enabling Microsoft Outlook Integration
Follow these steps to integrate Microsoft Outlook with Vymo:
-
Log In: Sign in to the Vymo web app and access the self-serve area within global settings.
-
Navigate to Integrations: Select the "Email" section and click "Enable" to activate Outlook integration for your account. Follow the on-screen instructions to proceed.
-
Choose the update window in the number of days as needed and select the various modules from the dropdown.
-
Save and release the changes.
Accessing Emails in Vymo
Once Outlook is integrated with Vymo, you can access your emails related to leads and partners directly within the Vymo app. These emails will be visible on the 'Activities this month' card on the Hello screen, along with outgoing emails where you are the sender.
By following these steps, you can seamlessly integrate Microsoft Outlook with Vymo to access email conversations conveniently from within the app.
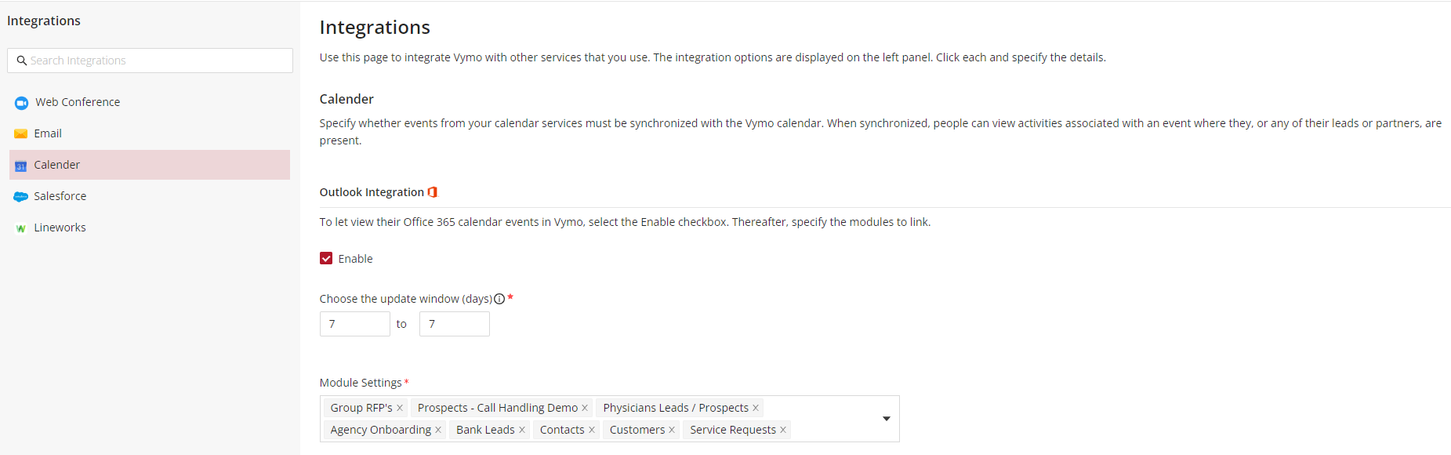
Vymo Integration with Microsoft Outlook Calendar
Calendar
Vymo allows you to synchronize events from your calendar services with the Vymo calendar. This integration enables you to view activities associated with events where you, or any of your leads or partners, are present. Here's how to integrate your Microsoft Outlook calendar with Vymo for seamless two-way synchronization.
Syncing Criteria
Vymo ensures focused synchronization based on the following criteria:
-
Event Organizer: Sync is limited to events where you are the organizer.
-
Updates: Changes made in Vymo are reflected in your Microsoft Outlook calendar, and vice versa.
-
Deletions: Events deleted in Microsoft Outlook appear as 'Cancelled' in Vymo.
-
Modifications: Changes to event descriptions, titles, or participants in Microsoft Outlook are updated in Vymo.
Please note that post-event modifications are restricted, and edits can only be made within the platform where the activity was originally created.
-
Microsoft Outlook: Activities created here must be edited in Outlook.
-
Vymo: Activities created in Vymo must be edited in Vymo.
Enabling Microsoft Outlook Calendar Integration
Follow these steps to integrate your Microsoft Outlook calendar with Vymo:
-
Log In: Access the Vymo web app and navigate to self-serve under global settings.
-
Access Integrations: Navigate to the Email section and select "Enable" to integrate Microsoft Outlook with your account. Follow the on-screen instructions to set up.
-
Choose the update window (days): Select the number of days for the date range within which events will be synchronized. All events within this date range are made available for the modules you specify.
-
Select the desired modules.
-
Click "Save and release the changes."
By following these steps, you can enable two-way synchronization between your Microsoft Outlook calendar and the Vymo calendar, allowing you to manage and view your activities and those involving your leads or partners seamlessly within the Vymo app.
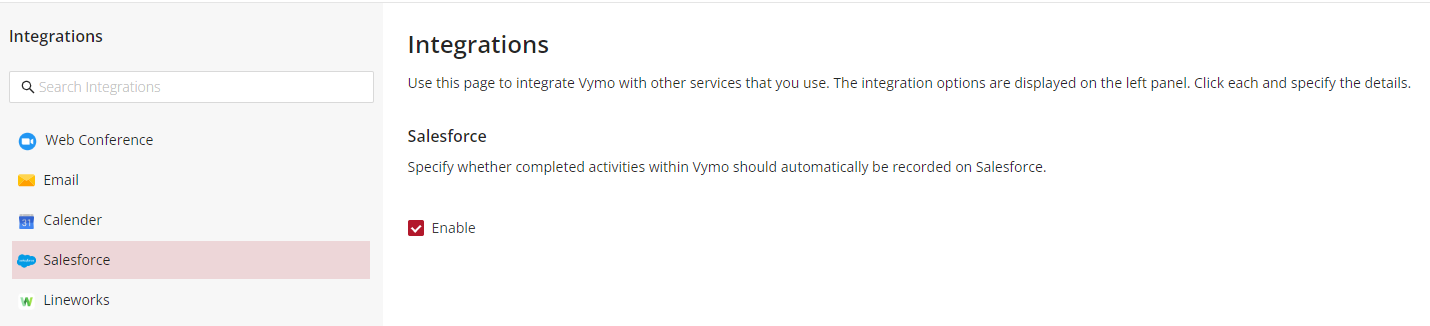
Vymo Integration with Salesforce
Salesforce
Specify whether completed activities within Vymo should automatically be recorded on Salesforce.
To ensure that all completed activities within Vymo are automatically recorded in Salesforce, a straightforward integration can be established. This guide will walk you through enabling this feature.
Enabling Salesforce Integration in Vymo
-
Log In: Access the Vymo web app and head to the self-serve section under global settings.
-
Navigate to Integrations: Find the Salesforce section within Integrations.
-
Enable Integration: Click on the Enable button to initiate integration with Salesforce.
-
Click Save and Release changes.
For more information, you can also refer to Vymo Salesforce Integration Documentation.
Vymo Integration with LINE WORKS
LINE WORKS is widely used for business communications. By integrating it with the Vymo app, you can automatically sync conversations with your contacts, leads, and partners, making business chat management more efficient.
Enabling LINE WORKS Integration
-
Log In: Sign into the Vymo web app and proceed to the self-serve portal within the global settings.
-
Integrations Access: Click on Integrations and locate the LINE WORKS section.
-
Enable Integration: Select Enable to begin setting up the integration with LINE WORKS. Follow the on-screen instructions provided.
-
Click Save and Release the changes.
Post-Integration Experience
Upon successful integration:
- The LINE WORKS icon will be visible on the top of the Hello Screen.
- New chat notifications from LINE WORKS will be directly accessible within the Vymo app.