How to Create Custom Roles
About This Feature
Vymo's role-based system ensures users access only the data and functions relevant to their responsibilities. Tailor these roles to meet your organization's unique requirements.
Step-by-Step Guide:
Initiating Role Creation:
-
Log into the Vymo web app.
-
Follow this path: Self Serve > User Management > Roles Configuration.
-
Click "Add" on the left pane to create a new role.
-
Input the relevant details for the role and click "Save".
Implementing Changes:
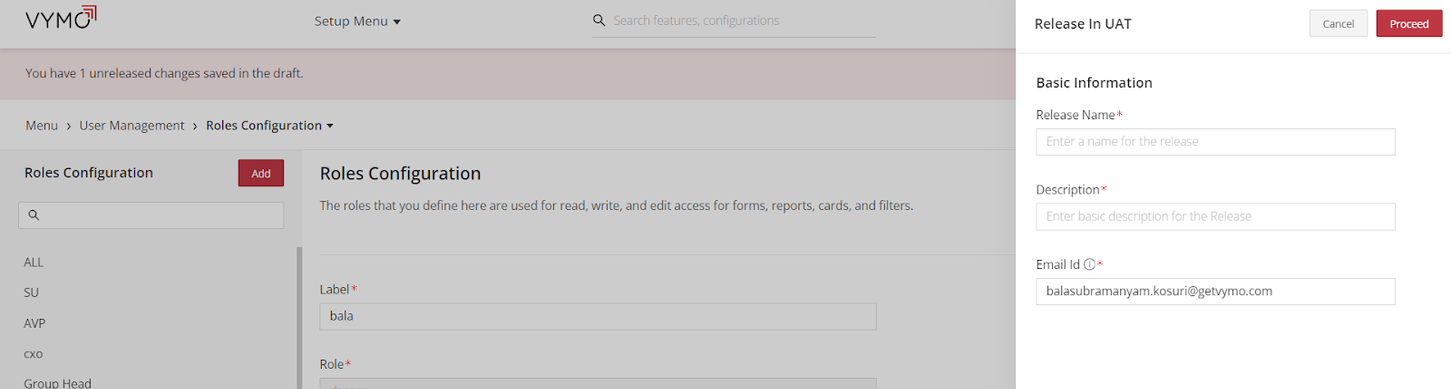
- Click on "Release Changes".
Note: Initiating this will implement all configurations, encompassing alterations made by all administrators.
-
"Release on UAT," prompts a pop-up window.
-
Complete the required fields and choose "Proceed".
-
You'll receive an OTP (One-Time Password) via email.
-
Enter this OTP when prompted, then confirm by selecting "Proceed" once more.
Final Steps:
- To view the changes, sign out and then sign back into Vymo.
Key Takeaways: Vymo's role management is foundational for user access control. It ensures users operate within the scope of their role, safeguarding sensitive data and boosting operational efficiency.
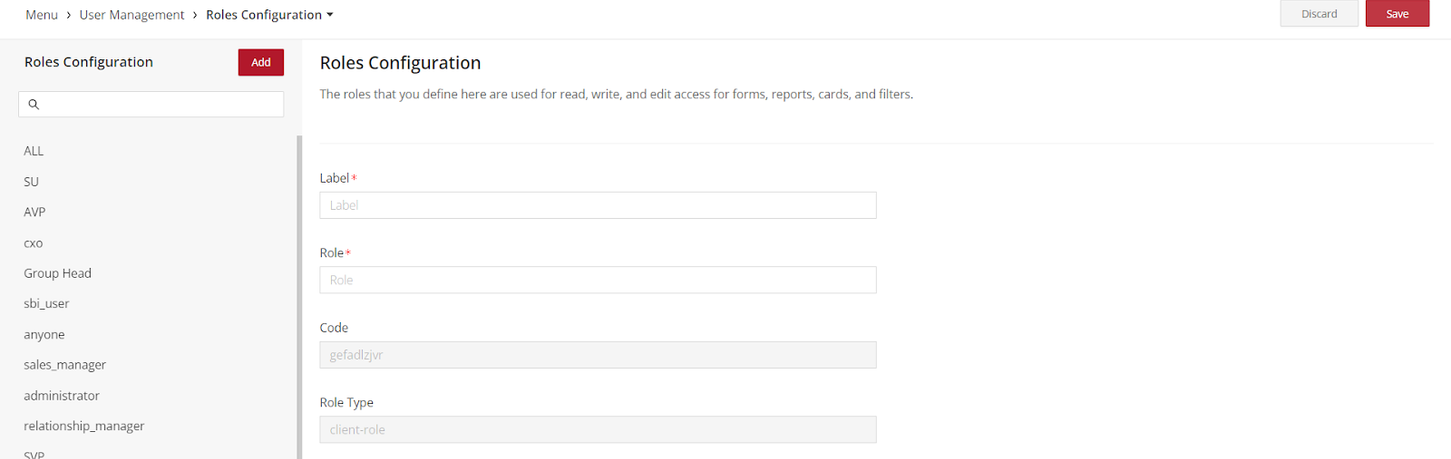
Adding New Role:
When adding, users will have two fields: "Role" and "Label". This distinction allows administrators to have a backend role name and a more user-friendly label displayed in the UI.
Note: Role names should be unique and can include certain special characters like (& - _ / ( ), . [ ] { }). If the role name has characters beyond these, a validation error will prompt you to provide a valid role name.
Similarly, the label field is essential, and leaving it blank will prompt an error.
Creating a new role in the system is a multi-step process. While defining and releasing the role is crucial, it's equally important to ensure the role is integrated with the relevant fields in the system. This guide will provide a step-by-step process to ensure seamless integration.
Integrating Role with Field Configurations:
-
Open Field Configurations: With the role created and released, move on to the "Field Configurations" document for guidance or navigate directly to Self Serve > User Management > Field Configuration in the system.
-
Select Role: Locate the newly created role in the list.
-
Configure Role Access: You'll encounter a variety of fields and actions the system offers. For each, determine if the new role should have access:
-
For fields like "User Details", "Contact Information", etc., decide if the role can view, edit, or both.
-
For actions like "Create New User", "Edit User", etc., decide if the role can perform these actions.
-
Apply Changes: Once you've gone through all fields and actions, save or apply the changes.
While configuring the role in the field configurations:
- Always ensure that the permissions set in the role configuration align with the field configurations.
- It's possible to grant a role certain permissions but then restrict them from accessing the necessary fields in the field configurations. Always double-check to avoid such contradictions.
Editing Existing Role:
- Navigate to the role you wish to edit.
- You can edit the "Label" associated with the role to ensure it aligns with any updated naming conventions or user-friendly names.
- The core "Role" name will remain un-editable to ensure the integrity of role-based configurations in the system.
Validations:
- With the enhancements, validations have been put in place to ensure role integrity.
- Any inconsistencies or errors, such as missing roles or discrepancies between role names and labels, will prompt error messages guiding you toward resolution.
Integrate with Other Features:
- Roles can be integrated with various features such as Activity Management, Coach, Web Dashboard Form, Goals, and RBAC Permission Page.
- Ensure that the role-label changes reflect consistently across all these features for a seamless user experience.
See also
- Roles Configuration