How to provision a customer instance
Before you can configure the Vymo app according to customer requirements, you must create a customer instance of the app. When you do so, the basic configuration is copied over from a template into a new instance, that you can then set up as needed.
Customer instances are always created on the staging server, which is a pre-production server. After you're sure that the set up meets all requirements, you can push the configuration to the production server, where it can go live.
Vymo-only task
This step needs VPN access and can be done only by the Vymo team.
Preparation
Use this checklist to collect the information you need to set up a customer instance on the staging server:
- Full name of the customer.
- Short name to use. This name is used as customer code everywhere in the app.
- The prefix to use for the web app URL. The URL is in the following format:
<prefix>.lms.getvymo.com. Oftentimes, this prefix is the same as the short name. - The time zone that the customer operates in. Only one time zone can be used (see tz database time zones).
- The currency code and symbol. Only one currency can be used (see Currency ISO codes and Currency symbols).
- The locale to use. Only one locale can be used, for example,
English (India) (en-IN). - The country calling code. Only one country can be used (see Calling codes).
- The measuring system to use for numbers. Only two methods are available:
KLCfor the thousand-lakh-crore system, andKMBfor the thousand-million-billion system.
Prerequisites
- Set up VPN access, because you can access or create client instance only through the Vymo VPN.
- Go to Pritunl and sign in with your Vymo Google credentials.
- On the Pritunl user profile page, click Download client. You're taken to a new tab. Don't close the previous tab (because you need a few more details from that page).
- Download the installer and run it.
- Open Pritunl and click Import Profile URI.
- Return to the Pritunl user profile page, copy your profile URI link, paste it in the Import Profile URI field, and click Import.
- Set up two-factor authentication (2FA) because the VPN access needs it.
- Install Authy.
- Open Authy and click Add Account to add the Vymo account.
- If you're installing Authy on your phone, scan the QR code.
- If you don't have access to a scanner or are installing Authy on your desktop, return to the Pritunl user profile page, click Enter key manually, copy the two-step authentication key, and paste it in Authy.
- Add a name, for example,
Vymo VPN, to the account.
- Open Pritunl and click the menu (three horizontal lines) towards the upper-right corner. Click Connect and enter the VPN number you see in Authy. You see the client and server addresses once VPN is successfully connected in Pritunl.
- Now you can log in to https://start.getvymo.com/.
Creating an instance
- Log in to https://start.getvymo.com/ with your Vymo Google credentials.
- Click the Click here to view on boarding template sheet link. You're taken to the template file.
- Copy the template (File > Make a copy) and, on the
Order Formsheet, enter the information in rows 10, 11, 25, and 31 through 37. Remember to enter a single space in row 37. Ignore the other rows; the data in those rows isn't used anywhere (they're configured later by you through self serve). Also ignore the sheets namedValidationsandDefault features. - Copy your spreadsheet URL and paste it in Onboarding New Client. The information in the spreadsheet is displayed in the Order Form section.
- Click Submit. You see a message saying that the request has been initiated. Click on the link in the message to see the status of your request.
Results
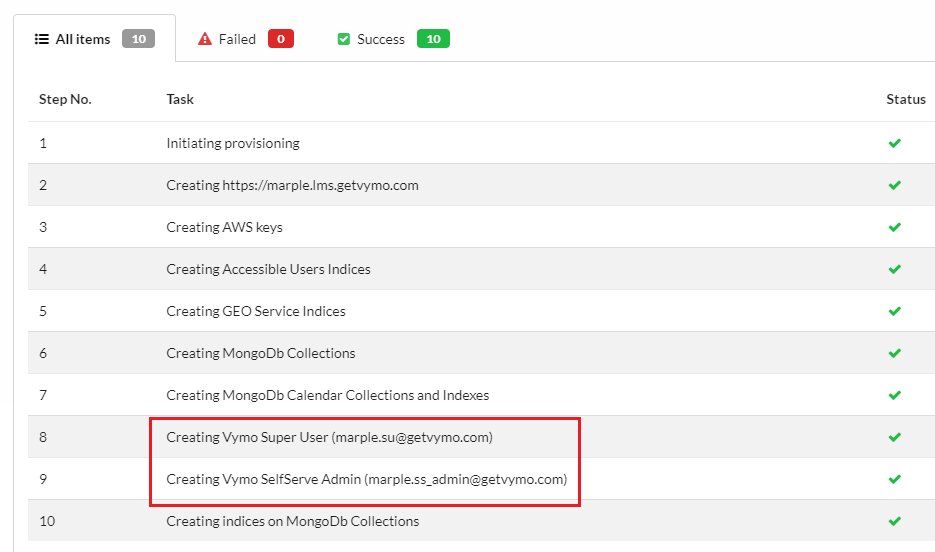
The status is displayed on the https://start.getvymo.com/#/home/requests/<request_number> page. As and when the tasks are done, an entry is displayed on the list. Make note of the email IDs for the super user and the self serve administrator.
The entire process of provisioning can take anything from a few minutes to a few days.
You see something like this on the list on the https://start.getvymo.com/ page.

Complete this task by clicking Activate for the UAT environment. Thereafter, log in to the instance by using the SU credentials at https://staging.lms.getvymo.com/#/login.
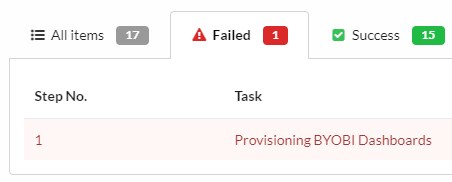
On the https://start.getvymo.com/#/home/requests/<your_request_number> page, make sure the Show hidden status option is set to True. If you see something like the following image, ignore it.
If the provisioning request is still not complete after a couple of hours, try sending the request again by using the Retry option.

If there are other errors, ask a question on the #selfserve Slack channel.
What to do next
After provisioning or creating a client instance, configure it according to the company's requirements. See Setting up a customer instance.