Creating leads
In Vymo, you have the flexibility to add leads individually or in bulk, ensuring efficient lead management tailored to your company's needs. Whether adding leads one by one or through bulk upload, Vymo provides seamless integration with allocation and prioritization rules, allowing for streamlined lead processing.
All changes and updates made to a lead are logged, and displayed as its audit history.
Adding a lead by scanning their business card
Adding leads via business card scanning offers a convenient and efficient way to capture lead information on the go. Follow these steps to add a lead using this method:
- Open the Vymo app: Launch the Vymo mobile application on your device.
- Access Lead Addition: Tap the large Plus button located near the bottom right of the screen.
- Select Scan Card: Tap on the "Add Lead" > "Scan Card" option, typically located near the top right of the screen. Note: Terminology may vary depending on your company's configuration
- Capture Information: Place the business card on a flat surface, point your phone's camera toward it, and let Vymo record the information.
- Review and Confirm: Review the scanned information for accuracy, make any necessary corrections, and tap "Submit" to finalize the lead addition process.
![]()
Adding leads one by one
You can add a lead through both the web app and mobile app. If you don't save the lead details after entering them, they're saved as drafts that you can save, update, or delete later.
- Web app:
- Log in: Access the Vymo web application using your credentials.
- Navigate to Leads: Click on "Leads" > "Leads list" in the navigation menu. Note: Terminology may differ based on your company's configurations.
- Add Lead: Click on "Add" to initiate the lead addition process.
- Enter Information: Fill in the required lead information.
- Finalize Addition: Click on "Add" to confirm and add the lead to your database.
- Mobile app:
- Open the Vymo app: Launch the Vymo mobile application on your device.
- Access Lead Addition: Tap the large Plus button near the bottom right of the screen.
- Initiate Lead Addition: Tap on "Add Lead" and follow the on-screen instructions to enter lead details.
Uploading leads in bulk
Bulk uploading of leads is a powerful feature available exclusively through the Vymo web application. This process allows you to swiftly import a large volume of leads from a .csv, .xls, or .xlsx file format, streamlining your lead management efforts.
Before you begin
Before initiating the bulk upload process, ensure you have completed the following preparatory steps:
Download the Template: Obtain the default template tailored for bulk lead uploads from the Vymo web application. This template comes pre-configured with essential fields such as Name, Phone, Lead Source, Parent Campaign, Sub Campaign, Email, and Employee ID. To download the default template, see Enabling the import and export of data.
Default template
To download the default template, use the following steps:
-  Log in to the Vymo web application.
-  Navigate to Leads > Leads List. (Note: Terminology may vary based on your company's configurations)
-  Click on "Bulk Upload" > "Download Template."
-  Enter the leads data in the spreadsheet. Make sure that the file contains 100,000 or fewer records, and is 100 MB or smaller.
Custom template
If you require additional fields beyond the default template, you have the option to create custom templates. Follow these steps to add custom templates for bulk lead uploads:
-  Log in to the Vymo web application.
-  Navigate to Self Serve > Module Settings > Under Preferred Lead > JSON Configurations > Bulk Upload Config.
-  Select the lead module for which you want to create a custom template and add the .csv, .xls, or .xlsx template file link in the template_url key.
- After adding the link, click "Save" near the top right, and then release the changes.
- Enter Lead Data: Once you have downloaded the template, populate it with the relevant lead data. Ensure that the file contains 100,000 or fewer records and is within 100 MB in size.
Once you have prepared the template with lead data, follow these steps to upload leads in bulk through the Vymo web application:
-  Log in to the Vymo web application.
-  Navigate to Leads > Leads List. (Note: Terminology may vary based on your company's configurations)
-  Click on "Bulk Upload."
-  Select the file containing lead data (.csv, .xls, or .xlsx format).
-  Click "Upload" to commence the bulk upload process.
Results
Upon successful completion of the upload process, the leads will be added to the list within the Vymo application. Any duplicates encountered during the upload process will be ignored, ensuring data integrity within your lead database.
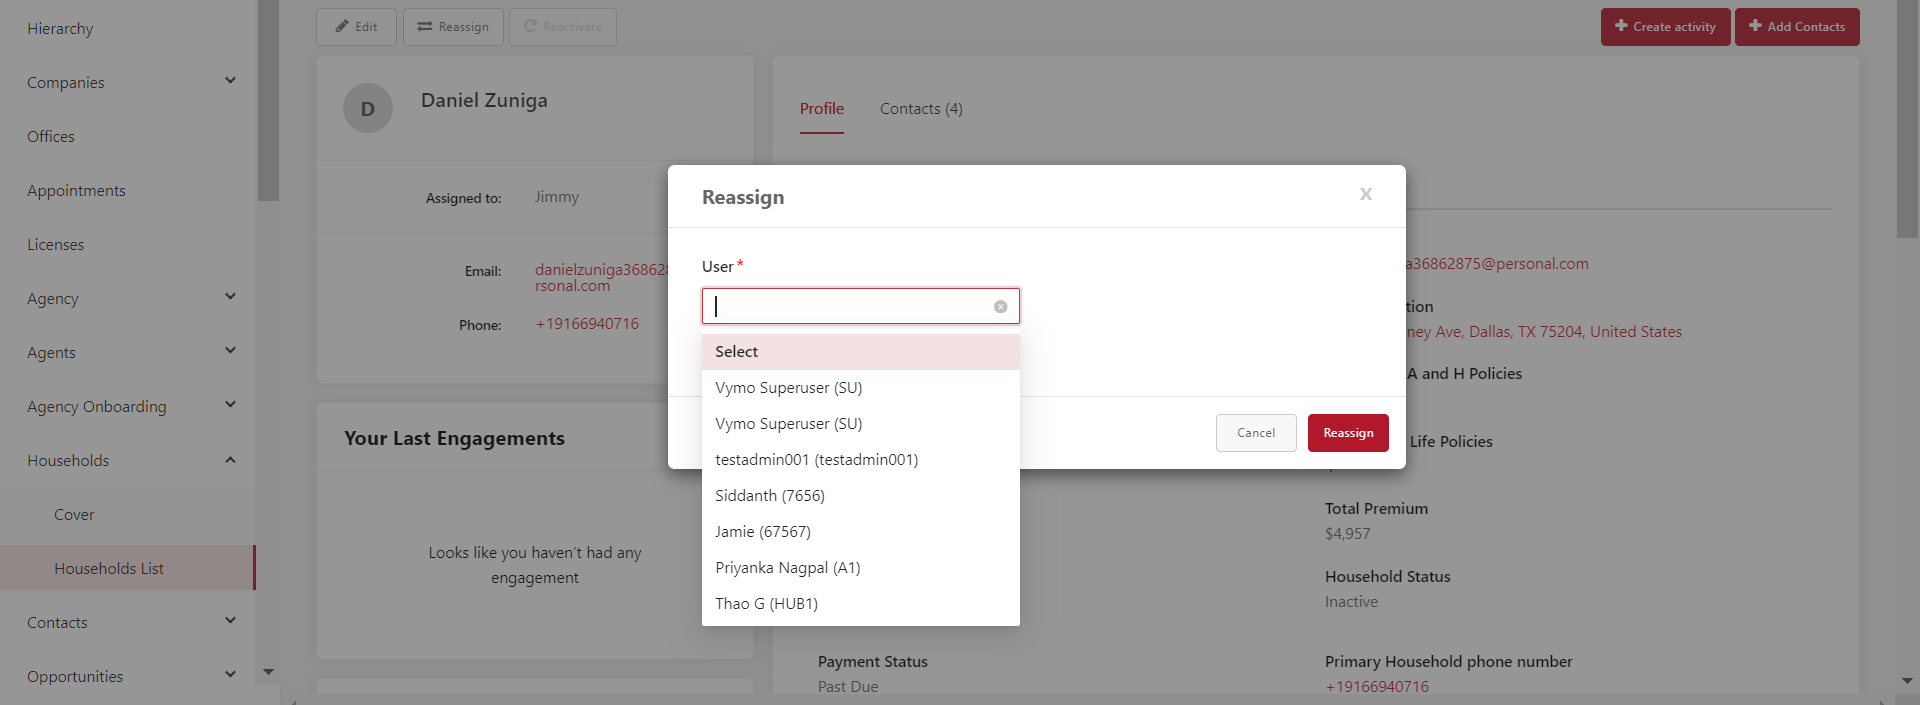
Assigning leads
In Vymo, assigning leads to your team members is a pivotal step in the lead management process. While allocation rules can automate this process, you retain the flexibility to manually override allocations for individual leads. Additionally, all modifications made to lead assignments are logged, providing a comprehensive audit trail.
-
Web app:
Follow these steps to assign leads using the Vymo web application:
- Log in to the Vymo web application: Access your Vymo account using your credentials.
- Navigate to Leads: Click on "Leads" > "Leads list" in the navigation menu. (Note: Terminology may vary based on your company's configurations)
- Select the Lead to Assign: Identify the lead that requires reassignment and click on it to select.
- Initiate Reassignment: Click on the "Reassign" option.
- Choose Assignee: Select the person to whom you want to assign the lead.
- Confirm Reassignment: Click on "Reassign" to finalize the assignment.
-
Mobile app:
Assigning leads through the Vymo mobile application is equally straightforward. Follow these steps:
- Open the Vymo app: Launch the Vymo mobile application on your device.
- Access Lead Details: Tap on "View All" on the Leads card. (Note: Terminology may vary based on your company's configurations)
- Locate the Lead: Find the lead you wish to reassign and tap on it to view its details.
- Initiate Edit: Tap on the "Edit" button located near the bottom right of the screen.
- Select Reassign: Choose the "Reassign" option.
- Choose Assignee: Select the person to whom you want to assign the lead.
- Confirm Assignment: Tap on "OK" to confirm the lead assignment. By following these simple steps, you can efficiently assign leads to your team members, ensuring effective distribution and management of leads within your organization.
Editing leads
In Vymo, you have the flexibility to modify lead information as needed, empowering you to keep your records accurate and up-to-date. Whether you're using the web application or the mobile app, the process for editing leads is simple and intuitive. Additionally, all changes made to a lead are logged, providing a transparent audit trail for accountability.
-
Web app:
Follow these steps to edit leads using the Vymo web application:
- Log in to the Vymo web application: Access your Vymo account using your credentials.
- Navigate to Leads: Click on "Leads" > "Leads list" in the navigation menu. (Note: Terminology may vary based on your company's configurations)
- Select the Lead to Edit: Identify the lead you wish to edit and click on its respective row.
- Initiate Edit: Click on the "Edit" option.
- Modify Information: Update the lead information as needed.
- Save Changes: Click on "Save" to confirm the modifications.
-
Mobile app:
Editing leads through the Vymo mobile application is equally straightforward. Follow these steps:
- Open the Vymo app: Launch the Vymo mobile application on your device.
- Access Lead Details: Tap on "View All" on the Leads card. (Note: Terminology may vary based on your company's configurations)
- Locate the Lead to Edit: Find the lead you wish to edit and tap on it to view its details.
- Initiate Edit: Tap on the ">" icon on the first card of the Details page.
- Start Editing: Tap on the "Edit" button located near the bottom right of the screen.
- Modify Information: Update the lead information as needed.
- Save Changes: Tap on "Update" to confirm the modifications. By following these simple steps, you can easily edit lead information on both the web application and the mobile app, ensuring that your records remain accurate and reflective of the latest information.
Reactivating a closed lead
In Vymo, reactivating a closed lead allows you to revisit and potentially pursue opportunities that were previously considered concluded. Whether you're using the web application, or reactivating a closed lead is a straightforward process. Follow the steps below to reactivate a closed lead:
- Log in to the Vymo web application: Access your Vymo account using your credentials.
- Navigate to Leads List: On the left-hand menu, click on "Leads List" to access the list of leads.
- Find the Lead Record: Locate the lead record you wish to reactivate. You can either scroll through the list or utilize the filter option on the right-hand side to narrow down your search.
-
Initiate Reactivation: Once you've identified the desired lead record, you have two options:
-
Reactivate from Leads List: Simply click on the "Reactivate" option displayed alongside the lead record in the leads list.
-
Reactivate from Lead Record: Alternatively, you can open the lead record by clicking on it, and then click on the "Reactivate" button within the lead record.
-

Exporting leads
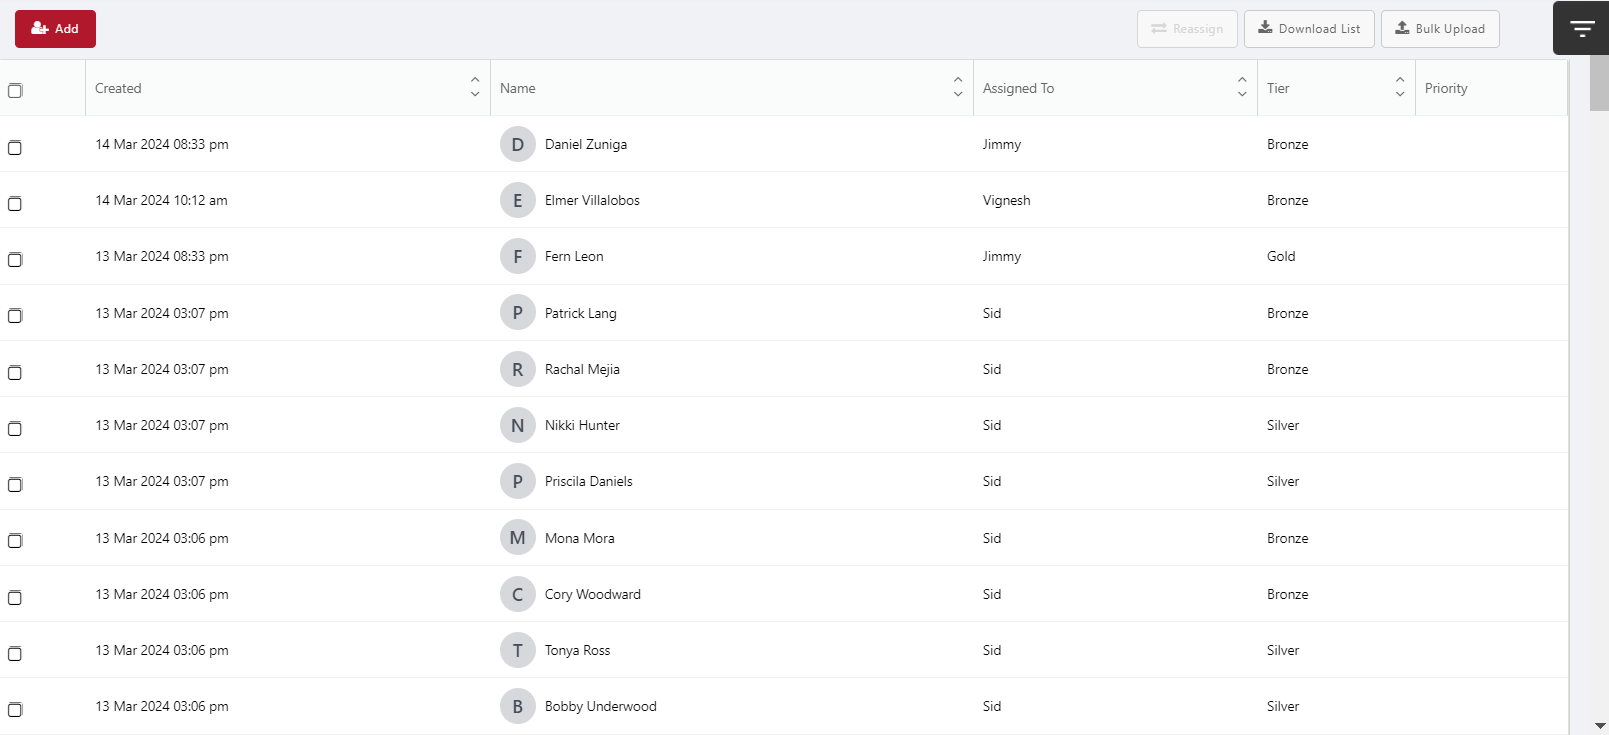
Exporting leads from Vymo allows you to generate a comprehensive .xlsx file containing the details of all leads within a specified module. This feature is particularly useful for creating backups, generating reports, or sharing lead data with stakeholders. Please note that lead exporting is only available through the web application. Follow the steps below to export leads:
To download leads, you must use the web application.
- Access the Vymo web application by entering your credentials.
- Click on "Leads" > "Leads list" in the navigation menu. (Note: Terminology may vary based on your company's configurations)
- Initiate Export:
        - Within the Leads List, locate the toolbar or options menu.

        - Click on "Download List" to initiate the export process.

        - By default, the exported file includes leads from the Month To Date (MTD) filter.

        - You can extend the date range up to 60 days to customize the exported data.

        - After selecting your desired date range, click on "Download List."

        - A .xlsx file will be generated, containing the details of all leads within the specified module.

        - Once the export is complete, you can either open the .xlsx file immediately or save it to your computer for future reference.
By following these steps, you can effortlessly export leads from Vymo, enabling you to manage, analyze, and share lead data effectively within your organization.
See also
- Adding leads to a campaign
- Allocating leads
- Enabling the import and export of data
- How to enable the scanning of business cards