Defining the Rules for Lead-by-Lead Automatic Allocation
Introduction
Automatic lead allocation is a mechanism that assigns incoming leads to sales representatives based on predefined criteria. When a lead is introduced, the system evaluates it against set rules to determine the most suitable salesperson. If an allocation is unsuccessful, the system retries after a brief interval. This guide delves into how these rules function and how you can set them up.
Lead Acquisition Methods
Leads can be sourced through:
- Bulk upload
- API calls
- Input forms (web and mobile apps)
Though allocations are almost instantaneous, there may be occasional lags of up to 15 minutes before they reflect on user devices.
Understanding Allocation Rules
Basics: Rules compare attributes. For instance, a lead's postal code might be compared to a salesperson's associated postal code. However, attributes of different data types (e.g., text vs date-time) cannot be compared.
Attributes for Rules: - Attributes of the 'new' state in the leads module - All user attributes - All metrics specified for the leads module
Logical Operators: These depend on the attribute's data type. Text data is suitable for comparisons like "equal to" or "not equal to".
Rule Set Evaluation: Rules are grouped in rule sets, which are evaluated sequentially. Within a rule set, if all conditions are true, a match is found, and the lead is allocated. If any rule within a set fails, the next rule set is considered.
Allocation Method: Leads are distributed in a round-robin or machine-learning fashion among available salespeople.
Prerequisites
- A list of salespeople. The leads that you upload are allocated to these people.
- Ensure Data Importer settings are configured for auto-allocation. Navigate: Customize > Module Settings > Data Importer > General settings > What should happen to the record when no user is mapped to it?
Setting Up Allocation Rules
-
Access the Vymo Web App: Start by logging in.
-
Navigate to Settings: Click on 'Self-serve', then 'Module Settings'. Next, select the relevant lead module.
-
Go to 'Allocation Configuration'.
-
Then from the dropdown, Select the method to allocate leads. By choosing either round-robin or machine learning.
-
Rule Creation: For each rule, choose a parameter, the evaluation condition, and the value for comparison.
-
Sequencing: The order of rules and rule sets determines the evaluation sequence. Rule sets use an IF-ELSE logic, while individual rules within a set use an AND logic.
-
Save & Draft: After defining rules, click 'Save'. A prompt indicates these are saved as a draft.
-
Release Management: Proceed to 'Release Management' to apply changes permanently.
-
Initiate UAT Release: Provide release details and ensure your email is correct to receive an OTP. Click 'Proceed'.
-
OTP Confirmation: Enter the OTP from your email and await the confirmation message.
-
Re-login: To activate the changes, log out and then log back in.
Overview of the Interface
Rule Sets: A section to manage and view your configured rule sets.
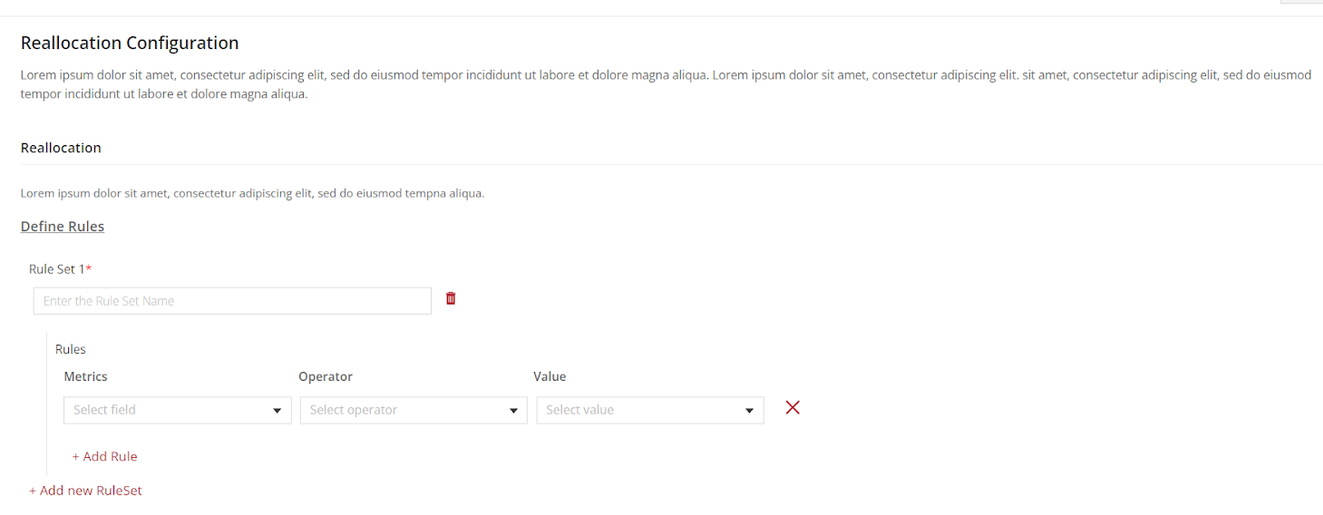
Creating a New Rule Set
To create a new rule set:
- Click on + Add new RuleSet.
- An Empty RuleSet will appear. Click on this section to expand it.
- Enter a name for your rule set in the Enter the Rule Set Name field.
Adding Rules to a Rule Set
Once you've named your rule set, you can start adding rules:
- Within the expanded rule set view, locate the Metrics, Operator, and Value dropdown menus.
- Select the desired metric from the Select field dropdown.
- Choose the appropriate operator from the Select Operator dropdown.
- Input or select the required value in the Select value dropdown or input field.
- If case sensitivity is essential, tick the Case Sensitivity checkbox.
- Click on + Add Rule to add additional rules to this rule set.
Configuring Rule Criteria
- Metrics: Represents the data field or parameter you want the rule to consider.
- Operator: Defines the condition for comparison, e.g., equals, greater than, less than, etc.
- Value: The specific value or threshold for the selected metric.
- Case Sensitivity: If checked, the rule will consider the letter case of values (e.g., "Apple" is different from "apple").
Deleting and Managing Rule Sets
- Delete Rule Set: To delete an entire rule set, click on the trash bin icon associated with that rule set.
- Duplicate Rule Set: If you want to create a copy of a rule set, click on the copy icon associated with that rule set.
-
Disable Ruleset: If you want to disable certain rule sets click on the toggle button.
-
Click save and release changes.
See also
- Allocation Configuration