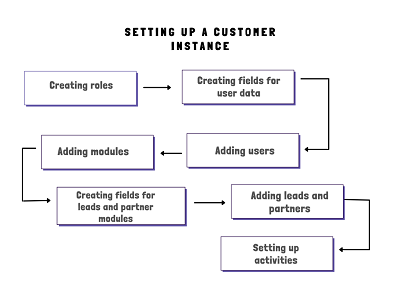
Setting up a customer instance
After provisioning or creating your customer instance, set up your instance according to your requirements. Use the login credentials for the super user account of your customer instance. Use the following sequence to set up your instance.
Creating roles
The first step is to add roles. These roles are attributed to users of the app. Create roles as required by your company. Use the following steps to create roles in your instance:
- Log in to the Vymo web app and click Customize (lower-left corner of the screen) > Global settings > Roles.
- Use the on-screen prompts and instructions to add roles.
- Click Save and release changes.
To know more about creating roles, see How to create custom roles.
Creating fields for user data
After creating roles, add users who use the Vymo app. Before doing so, specify the fields in the new user entry form. You can customize the fields for a new user entry.
- Log in to the Vymo web app and click the gear icon :octicons-gear-16: in the upper-right corner of the screen.
- To create fields for user data, in the User Management section, click Field Configuration.
- On the Field Configuration page, towards the upper-left section, click Add New and drag a field from the left to the center. (Or, you might choose to use the Add Field option (towards the upper-right), select a field type from the options, and enter the configuration options).
- To configure the field, click the pencil icon :material-lead-pencil:. On the Edit Field page, make the changes.
- When you are done, click Save and release changes.
To learn more about fields and creating fields, see How to create fields
Adding users
The next step is to add users who will be using the app. The roles added in the first step are used while adding users. You can add one user account at a time or add several user accounts at once (bulk upload). To learn more about adding users, see Add user accounts.
Adding modules
Add lead or partner modules that the user roles work with. Use the following steps to add modules:
- Log in to the Vymo web app and click the gear icon :octicons-gear-16: in the upper-right corner of the screen.
- In Module Settings, click Add Module. Follow the onscreen instructions.
- Click Save and release changes.
Creating fields for leads or partners module
Creating fields for leads and partners module is different from creating fields for user data. Fields created in a module are applicable only to that module. Use the following steps to add or edit fields for modules:
- Log in to the Vymo web app and click the gear icon :octicons-gear-16: in the upper-right corner of the screen.
- To create fields for a leads or partners module, in the Module Settings section, click the module where the fields are to be created. Then, click Field Configuration.
- On the Field Configuration page, towards the upper-left section, click Add New and drag a field from the left to the center. (Or, you might choose to use the Add Field option (towards the right), select a field type from the options, and enter the configuration options).
- To configure the field, click the pencil icon :material-lead-pencil:. On the Edit Field page, make the changes.
- When you are done, click Save and release changes.
Adding leads and partners
After adding modules, add leads, or partners to the modules. To learn how to add leads and partners, see Creating leads and Creating partners.
Setting up activities
Define the activities for modules and users, and then specify the configuration options such as activity filters, role-based filter visibility, user delight, and activity edits. To know more about activities, see Setting up activities.