Meetings with Microsoft Teams in Vymo
If your company uses Microsoft Teams for conducting meetings, you can choose to automatically log these meetings as activities on the Vymo app. To do so, you must link Microsoft Teams with the Vymo app. You can also schedule and join Microsoft Teams meetings from the Vymo app.
After the integration is enabled, Microsoft Teams meetings with leads and partners are automatically recorded as an activity in the Vymo app as soon as the meeting ends. At least one of the participants in the meeting must be a lead, a partner, or a Vymo account user. The host of the meeting should be a Vymo account user and a licensed Microsoft Teams user.
Requirements for Microsoft Teams integration
Vymo integrates with Microsoft Teams using the Microsoft Graph REST API and requires a few API permissions to do so.
| API Permission Requested | Access given to Vymo | Why does Vymo need this permission? | How does Vymo use this permission? |
|---|---|---|---|
| OnlineMeetings.Read.All | Lets Vymo schedule and read online meetings without you signing in | This API fetches details about completed Microsoft Teams meetings and log them as sales activities | To know the list of people invited to the meeting and other meeting information |
| CallRecords.Read.All | Lets Vymo read call records for all calls and online meetings without you signing in. This is not an actual recording of the meeting. This is only a log of the meeting duration, participants and their time spent in a meeting | This API gives the list of participants in a meeting and the duration of attendance. It returns user information in user IDs (Microsoft ID) | Microsoft sends all meeting records to Vymo. Vymo only analyzes meeting records where the host is a person who uses Vymo |
| User.Read.All | Lets Vymo read the set of profile properties, group membership, reports, and managers of other people in your company, without you signing in | This API lets Vymo map the Microsoft user ID (unknown to Vymo) to an email ID (known to Vymo) | Vymo only reads user records of people who are invited to or have participated in meetings hosted by a person who uses Vymo |
| OnlineMeetingArtifact.Read.All | Lets Vymo read online meeting artifacts in your company, without you signing in | This API lets Vymo map the Microsoft user ID (unknown to Vymo) to an email ID (known to Vymo) | Vymo will only read attendance details of meetings scheduled from Vymo or synced to Vymo for reporting purposes. |
Enabling the Microsoft Teams integration
To enable the automatic syncing and logging of activities:
- Log in to the Vymo web app and click the gear icon :octicons-gear-16: in the upper-right corner of the screen.
- Click Integrations. Go to Microsoft Teams section and click Enable. Copy the link and send it to your company's administrator so Microsoft Teams is connected to Vymo. If you are the administrator, use the following section to connect your company's Microsoft Teams account to Vymo.
- Click Save. You see a message that the changes are now saved as a draft.
- In the message box, click Go To Release Management so that you can move the changes permanently to the live configuration.
- Click Create a UAT release. Specify the release details and make sure to enter your own email ID because that's where you receive a one-time password (OTP) to continue with the process. Click Proceed.
- Enter the OTP you received in the email, and click Submit. Wait for a while till you see a confirmation message saying the process is complete.
- To see the changes, log out and log in again.
Connecting your Microsoft Teams account to Vymo
After enabling Microsoft Teams integration, connect your Microsoft Teams account to Vymo. The following steps are to be done by your company's IT administrator. If you are the administrator, contact Vymo Support for assistance.
- Log in to the Vymo web app and click the gear icon :octicons-gear-16: in the upper-right corner of the screen.
- Click Integrations. Go to Microsoft Teams section and click the link to start the authorization process. Sign in to Microsoft using the administrator account. Make sure that the application name is Vymo - MS Teams Connector. Verify all the three permissions listed (Read all users’ full profiles, Read and create online meetings, Read all meeting records).
- Click Save. You see a message that the changes are now saved as a draft.
- In the message box, click Go To Release Management so that you can move the changes permanently to the live configuration.
- Click Create a UAT release. Specify the release details and make sure to enter your own email ID because that's where you receive a one-time password (OTP) to continue with the process. Click Proceed.
- Enter the OTP you received in the email, and click Submit. Wait for a while till you see a confirmation message saying the process is complete.
- To see the changes, log out and log in again.
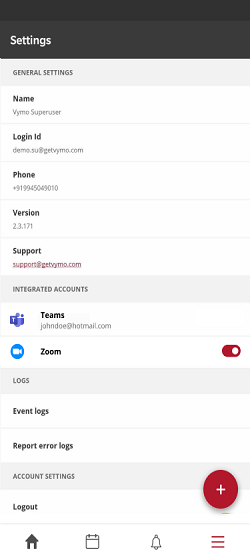
After Microsoft Teams is connected to Vymo, you should be able to see it in the Settings page.
Mapping users between Vymo and Microsoft Teams (Azure AD)
Azure Active Directory
Your Microsoft Teams account contains some or all users in your Azure AD account.
For the Vymo and Microsoft Teams integration to work, there needs to be a mapping between the user records in Vymo and Microsoft Teams (Azure AD). The default user mapping is done by using your email ID, which is the email field on the Vymo user record. This email ID is mapped to the mail field on Azure AD to match users between Vymo and Microsoft Teams. To use a different field to find matching users between Vymo and Microsoft Teams, use the following steps:
- Log in to the Vymo web app and click the gear icon :octicons-gear-16: in the upper-right corner of the screen.
- In User Management section, click JSON Configuration.
- Locate Features and go to
teams_integrationobject. - Specify the Microsoft Teams ID in
teams_keyparameter and Vymo ID invymo_keyparameter. The following code has Microsoft Teams user ID asmailand Vymo ID asemail. The key can be mail, agent code or any other key, based on your company's preference. - When done, click Save near the top right. Then, release the changes.
    {

  "type": "generic",
  "disabled": false,
  "order": null,
  "code": "teams_integration",
  "name": "Teams Integration",
  "properties": {
    "valid_meeting_duration": 0,
    "user_mapping": {
      "teams_key": "mail",
      "vymo_key": "email"
    },
    "valid_meeting_criteria": {
      "vo_count": 1,
      "v_user_count": 1
    }
  }
}
Specifying the meeting criteria
A Microsoft Teams meeting is logged as an activity only if the meeting is held for a specific duration and consist of a minimum number of participants. This meeting criteria is specified based on your company's preference. To specify the meeting duration, use the following steps:
- Log in to the Vymo web app and click the gear icon :octicons-gear-16: in the upper-right corner of the screen.
- In User Management section, click JSON Configuration.
- Locate Features and go to
teams_integrationobject. - Specify the meeting duration in the
valid_meeting_durationparameter. The unit of measure is seconds. - Specify the minimum number of participants in a meeting in
valid_meeting_criteria.vo_countrefers to the minimum number of leads or partners in the call.v_user_countrefers to the minimum number of Vymo users in the meeting. - When done, click Save near the top right. Then, release the changes.
    {

  "type": "generic",
  "disabled": false,
  "order": null,
  "code": "teams_integration",
  "name": "Teams Integration",
  "properties": {
    "valid_meeting_duration": 0,
    "user_mapping": {
      "teams_key": "mail",
      "vymo_key": "email"
    },
    "valid_meeting_criteria": {
      "vo_count": 1,
      "v_user_count": 1
    }
  }
}
Visual guides
Scheduling Microsoft Teams meetings
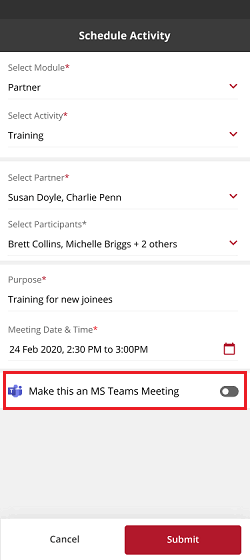
When you schedule or update an activity, there is an option to make it a Microsoft Teams meeting. This option is available only if you have a Microsoft user ID.
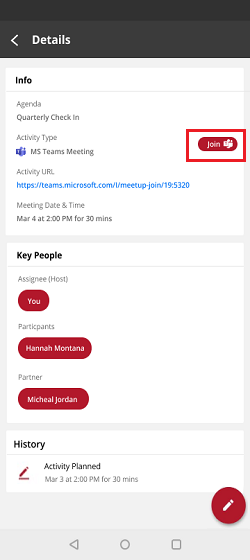
Sharing the meeting link
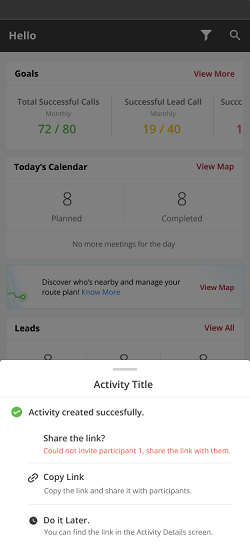
The meeting link is generated when you schedule a Teams meeting. If you are not able to invite participants to the meeting, share the meeting link with them.
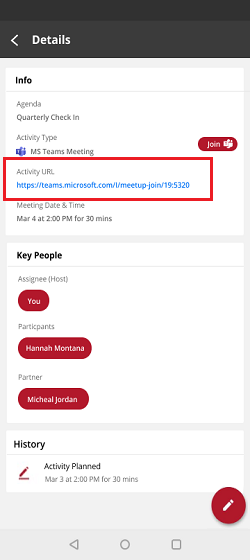
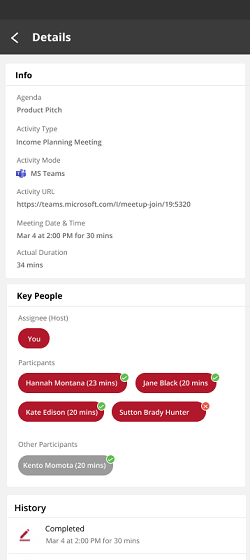
Find the link in the activity details page. Tap the link to get options to share.
Joining Microsoft Teams meetings
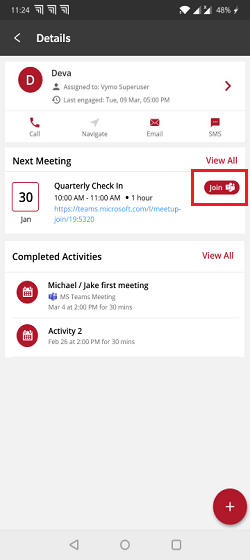
On the mobile app, you see the option to join a Microsoft Teams meeting in your calendar, the activities list, the activity details page and in the lead or partner details page.
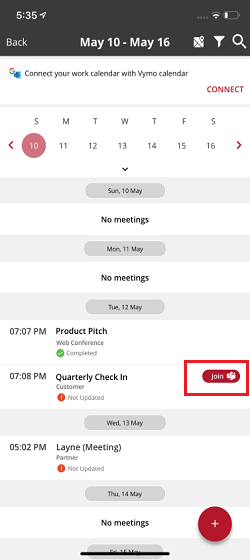
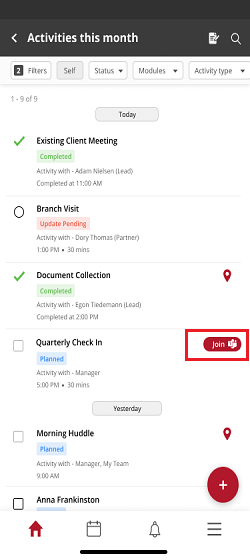
In the web app, you see the option to join in the Activity List.

Viewing participant attendance
View the participants who were invited and were in attendance. You can also view participants who were not invited but attended the meeting (marked in grey). To see the participant details, go to the activity details page. You can also access the meeting attendance report where you can view the attendees and duration of attendance.
Reassigning meetings
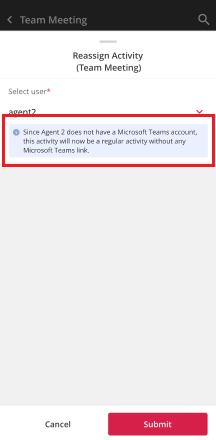
You can reassign activities to other people using the reassign option in the FAB (floating action button) menu. This means, the person you reassign the activity to now is the host of the meeting. The meeting host must have a Microsoft Teams account.
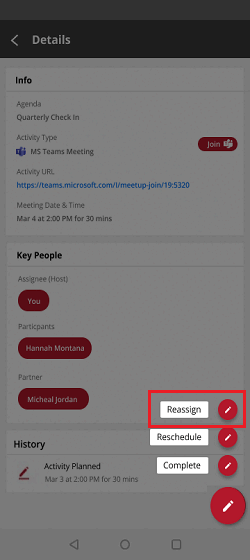
If they do not have a Microsoft Teams account, the activity is created as a regular activity or can be reassigned to someone who has an account.
See also
- Making calls from the Vymo app
- Calling with Webex from Vymo
- Connecting LINE WORKS to Vymo
- Calling with Zoom from Vymo