Specifying the fields for data import
You can specify the import fields for only the new state for leads and partners modules. For activities, you can import data for only the schedule and log options. These fields are then used in the file templates for uploads.
Before you begin
Enable the import of data. See Enabling the import and export of data.
Configuring an import template for leads and partners: Self serve
- Log in to the web app and click Customize > Module Settings.
- Click the edit icon :material-lead-pencil: for the module to specify the import settings for. In the Import-Export section, click Data Importer.
- Click Add Field and select an option from the drop-down list. The field details are displayed. Click Add. Repeat for as many fields as needed.
- Specify which of these fields to use as the unique ID for the uploaded record.
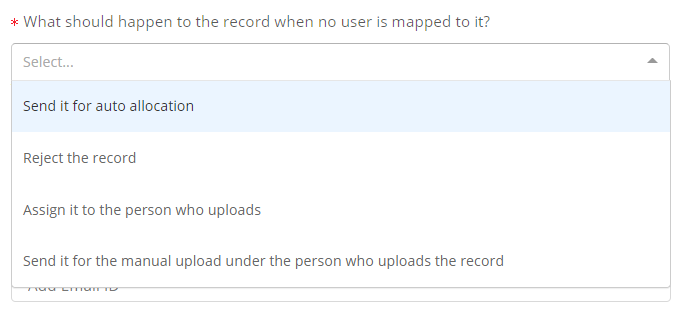
- Specify what should be done if no person is mapped to the lead or partner being uploaded.
- Specify who should receive an email about the upload jobs, and what the email should contain.
- When done, click Save.
- In the message box, click Go To Release Management so that you can move the changes permanently to the live configuration.
- Click Create a UAT release. Specify the release details and make sure to enter your own email ID because that's where you receive a one-time password (OTP) to continue with the process. Click Proceed.
- Enter the OTP you received in the email, and click Submit. Wait for a while till you see a confirmation message saying the process is complete.
- To see the changes, log out and log in again.
Next time when you do a bulk upload (Module name > Module name list > Bulk Upload), the fields that you specified are put in a template file that you can download, add data to, and upload.
Configuring an import template for leads and partners: JSON
- Log in to the web app and click Customize > Global Settings > Custom Configurations.
-
Locate the
importerConfigobject, and add an object to it for the module that needs the import template. Use the following code snippet for guidance.Code comments
- Line 2: A comma-separated list of the codes of the modules for which bulk upload is enabled. This example has only one module (with the module code
leads). - Lines 4 through 56: One parameter (object) for every module listed in line 2. In this example, only one module is listed; the name of the parameter is, therefore,
leads, which is the module code. - Lines 6 through 14: The columns of the upload template file (also see Special consideration for the address fields).
- Line 17: The field code for the new state of leads for the module listed in line 2.
- Line 21: A comma-separated list of email IDs that are notified about the bulk upload.
- Lines 22 through 26: Used for the message that's emailed when the upload job is complete.
 1
 2
 3
 4
 5
 6
 7
 8
 9
10
11
12
13
14
15
16
17
18
19
20
21
22
23
24
25
26
27
28
29
30
31
32
33
34
35
36
37
38
39
40
41
42
43
44
45
46
47
48
49
50
51
52
53
54
55
56
57
"importer_config": { "modules": ["leads"], "use_new_importer": true, "leads": { "name": "Leads", "columns_map": { "name": "Name", "phone": "Phone", "email": "Email", "city": "City", "dsaworkaddress_jaq5jtp6t":"Work Address 1", "dsaworkaddress_duh7nap0q":"Work Address 2", "leadid": "Lead ID", "pincode": "Pincode" }, "reactivate": false, "start_state": "leads_new", "identifier": ["leadid"], "ignore_and_save": true, "update": true, "email_list": ["[email protected]","[email protected]"], "email_template": { "header_name": "Vymo", "subject": "Lead bulk upload summary", "from_email_prefix": "support" }, "asynchronous_ingestor_attributes": { "chunk_ingestion": { "enabled": true, "order": { "cardinality": 10, "batchSize": 100 }, "size": 50 }, "file_ingestion": { "type": ["csv", "xlsx", "xls"], "order": { "cardinality": 10, "batchSize": 0 }, "max_allowed_rows_count": 500000 } }, "enable_template": false, "custom_column_map": { }, "exclude_from_inputs": [], "auto_allocation": true, "user_mapping_column": "Emp Id", "user_assign_mapping": { "column": "Emp Id", "required": false }, "user_code_case_insensitive": true }, } - Line 2: A comma-separated list of the codes of the modules for which bulk upload is enabled. This example has only one module (with the module code
-
Click Save.
- In the message box, click Go To Release Management so that you can move the changes permanently to the live configuration.
- Click Create a UAT release. Specify the release details and make sure to enter your own email ID because that's where you receive a one-time password (OTP) to continue with the process. Click Proceed.
- Enter the OTP you received in the email, and click Submit. Wait for a while till you see a confirmation message saying the process is complete.
- To see the changes, log out and log in again.
Importing activities
See Uploading activities in bulk.
Special consideration for the address fields
By default, the following location fields are available in every client instance:
gc_secondary_locationgc_office_locationgc_locationgc_alternate_locationgc_home_locationgc_primary_location
Each of these field types contain parameters that can automatically convert an address to a pin on a map.
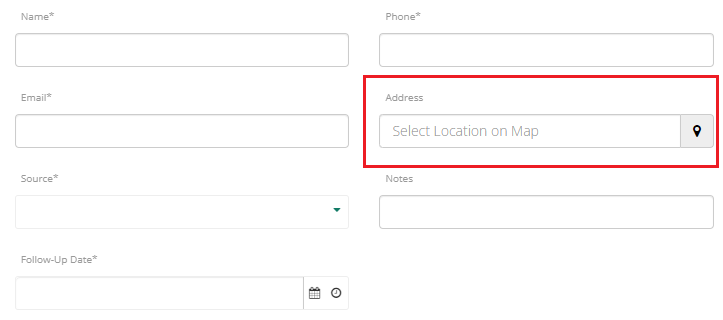
If your upload template needs address fields, follow these steps:
- Use one of these standard address fields listed in the previous paragraph. If the template doesn't contain one of these fields, the address can't be automatically converted to a correct map location.
-
In the import template, use only those location attributes that are defined in the
addressAttributesobject of that address field. For example, the following code snippet shows thegc_secondary_locationaddress field. The highlighted lines show the location attributes that you can use in the import template if you use thegc_secondary_locationaddress field. Make sure to use at least these four attributes: address line 1, address line 2, city, and postal code.1 2 3 4 5 6 7 8 9 10 11 12 13 14 15 16 17 18 19 20 21 22 23 24 25 26 27 28 29 30 31 32 33 34 35 36 37 38 39 40 41 42 43 44 45 46 47 48 49 50 51 52 53 54 55 56 57 58 59 60 61 62 63 64 65 66 67
"gc_secondary_location":{ "code": "gc_secondary_location", "deleted": false, "locationAttribute": "secondary_location", "addressAttributes": [ { "disabled": false, "order": 10, "attribute": "secondary_address_line_1" }, { "disabled": false, "order": 20, "attribute": "secondary_address_line_2" }, { "disabled": false, "order": 30, "attribute": "secondary_house_no" }, { "disabled": false, "order": 40, "attribute": "secondary_building" }, { "disabled": false, "order": 50, "attribute": "secondary_street" }, { "disabled": false, "order": 60, "attribute": "secondary_area" }, { "disabled": false, "order": 70, "attribute": "secondary_taluk" }, { "disabled": false, "order": 80, "attribute": "secondary_city" }, { "disabled": false, "order": 90, "attribute": "secondary_district" }, { "disabled": false, "order": 100, "attribute": "secondary_state" }, { "disabled": false, "order": 110, "attribute": "secondary_country" }, { "disabled": false, "order": 120, "attribute": "secondary_pincode" } ], ... -
To see which attribute to use, click Customize > Global Settings > Field Management, and look for fields of the type
location).
For information on the default location fields, see The geoCodingConfig object.
Visual guides
The following video shows the steps to configure an import template for leads and partners.